How to set up your new Windows laptop like a pro: out-of-the-box tips
Here are some outside-the-box ideas for setting up your new Windows laptop.
Picture it: you pull out that brand-new laptop you bought after reading our latest buying guide and plug it in for the very first time. Now it's just a matter of breezing your way through the Windows setup process, and you're ready to rock, right? Not really. Your notebook isn't really ready — or truly yours — until you do some tweaking. Here are a few things to consider when setting up your new laptop.
Run all Windows updates
Your computer is probably going to download a series of Windows 10 updates all on its own, so why not get it over with by forcing them to install manually?
1. Type "updates" in the search box.

2. Click "Check for updates."
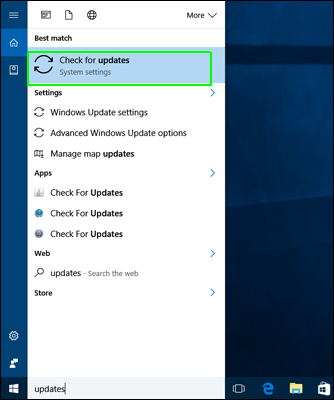
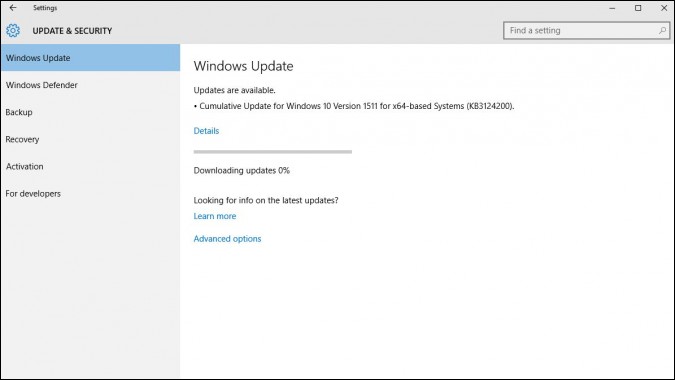
Windows will start searching for and downloading updates, but you don't have to wait for this process to complete before moving on to your next task.
3. If Windows doesn't automatically search for updates, select the "Check for updates" box.
Uninstall bloatware
Like it or not, most PC vendors preload annoying third-party software on your computer. From 30-day antivirus trials to casually addictive desktop games you may not want to play (ex: Candy Crush), this bloatware is poised to suck up valuable system resources. To uninstall it:
Stay in the know with Laptop Mag
Get our in-depth reviews, helpful tips, great deals, and the biggest news stories delivered to your inbox.
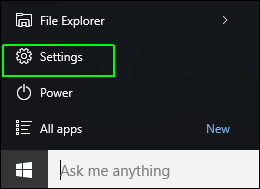
1. Navigate to Settings. You can get there from the Start Menu.
2. Select System.
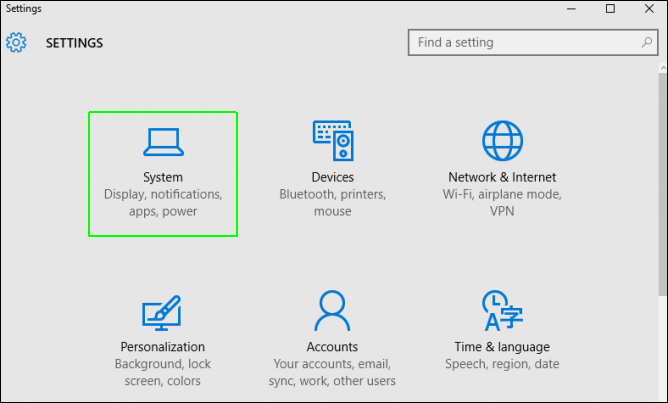
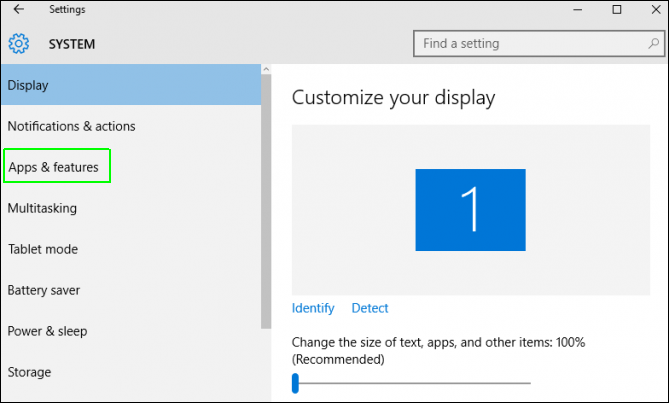
3. Select Apps and features from the left menu. If you don't see this option, press inside the search box and type Apps, then select "Apps and features." (Alternatively, you can skip steps 1 and 2 and type "Uninstall" from the Search Box on the Taskbar and choose "Add or remove programs.")
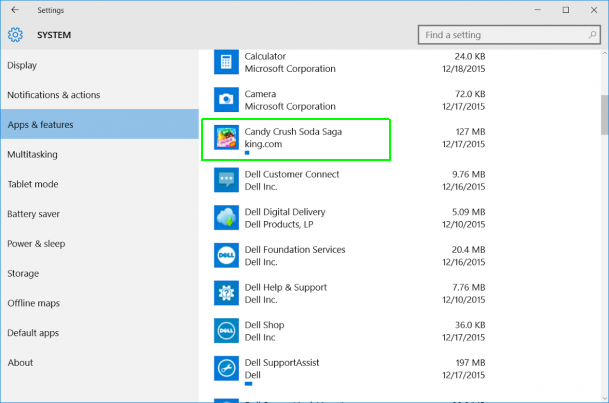
4. Select an app you wish to uninstall.
5. Click Uninstall.
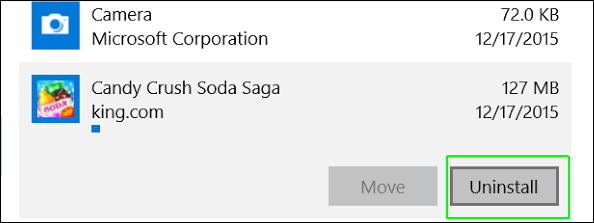
6. Click the second Uninstall button that appears.

Copy or sync your files
What good is your new computer if it doesn't have your most important data on it? There are several viable ways to move your documents, photos, videos and other key files over from an old computer.
- OneDrive Sync: If your important files are stored in OneDrive, they will automatically download to the new computer once you log into the new PC with your Microsoft account.
- Dropbox or Google Drive: These services work just like OneDrive but don't come preloaded with Windows (unless your laptop manufacturer put them there). If you were using them to store files on your old computer, install them on the new one.
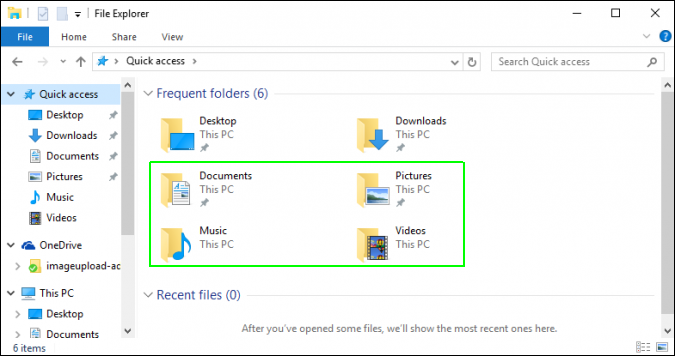
- Copy files manually. Select all the files under your Documents, Music, Videos and Photos libraries, copy them to an external drive (ex: Flash drives, hard drives) and then copy them over to the new machine. This is a bit tedious, though, so we recommend using cloud storage if possible.
Install antivirus software
Antivirus software is important no matter how careful you think you are on the internet. If you hit even one wrong link, accidentally or otherwise, your entire computer could become victim to a malware infection — an awful scenario that can generally be avoided with some good antivirus software. The point of antivirus software is to prevent these sorts of situations before they happen and, if that fails, fix them immediately afterward. It's crucial that you have some sort of antivirus software to shield your PC from threats.
If you're looking for a recommendation, our techie colleagues rated Bitdefender as one of the best free antivirus software solutions available, thanks to its excellent malware protection and low impact on your PC's performance, not to mention 24/7 customer support. With Bitdefender, you can prevent virus attacks before they happen; you can also scan and eliminate threats after the fact, if anything harmful manages to make it onto your computer. Here's a quick guide on how to install Bitdefender free antivirus software.
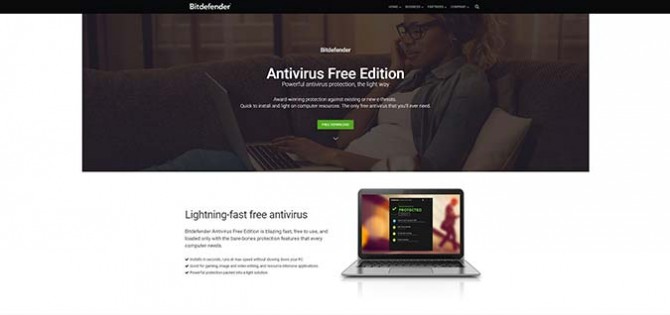
1. Click the big green "free download" button on Bitdefender's site.
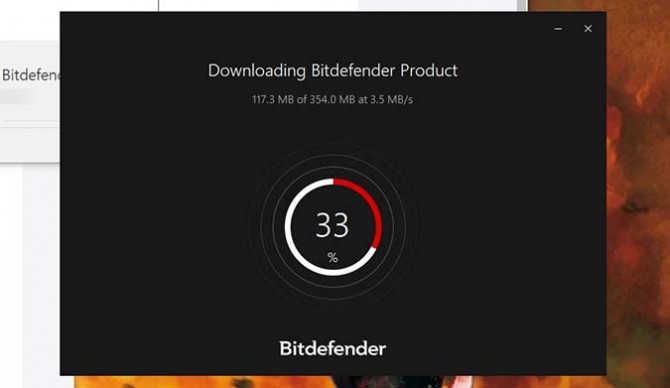
2. Go to your downloads folder and find the bitdefender_online.exe file you just downloaded. Click on it. It will then install Bitdefender.
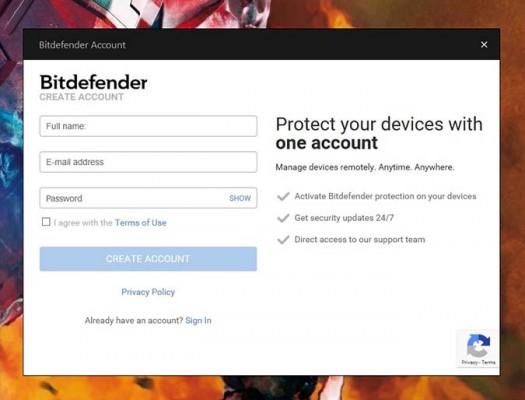
3. To avoid annoying pop-up reminders or any potential long-term issues with Bitdefender's functionality, make a Bitdefender account (the window for doing this will appear automatically after installation). It's as simple as providing your name, email and creating a password. From there, Bitdefender will operate autonomously and let you go about your internet activities in peace, protecting you all the while.
Set up Windows Hello Fingerprint or face logins
Many current-generation laptops come with a fingerprint reader or infrared camera for facial recognition. If you have either one, you should set up Windows Hello, a feature that lets you log in with a finger or a glance, so you can avoid the hassle of using a normal password. This is another great security feature to keep your files protected.
1. Navigate to Settings.
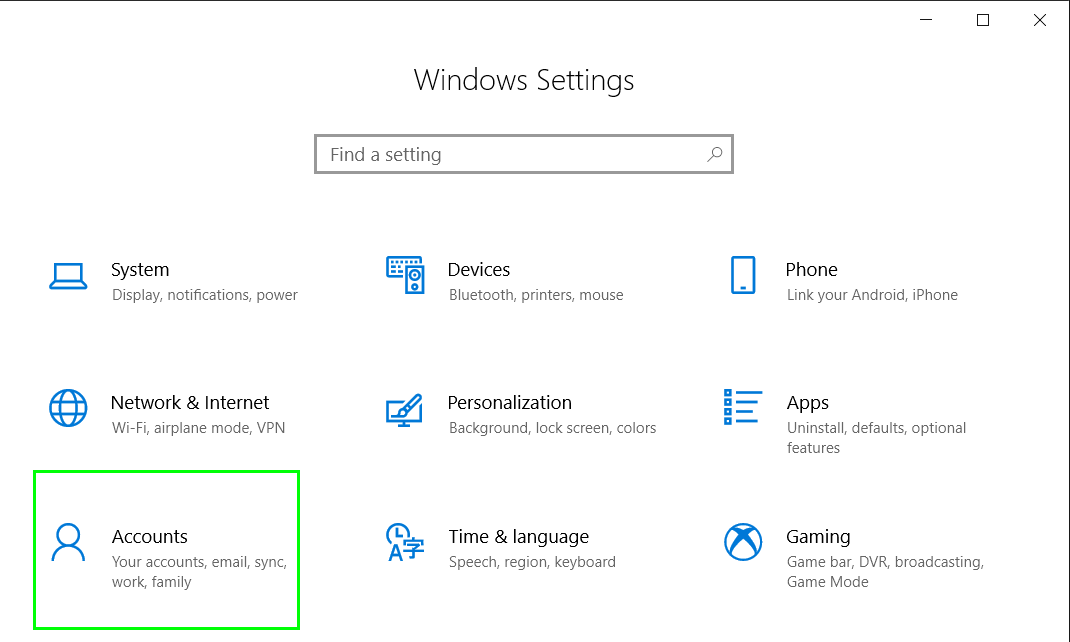
2. Click Accounts.
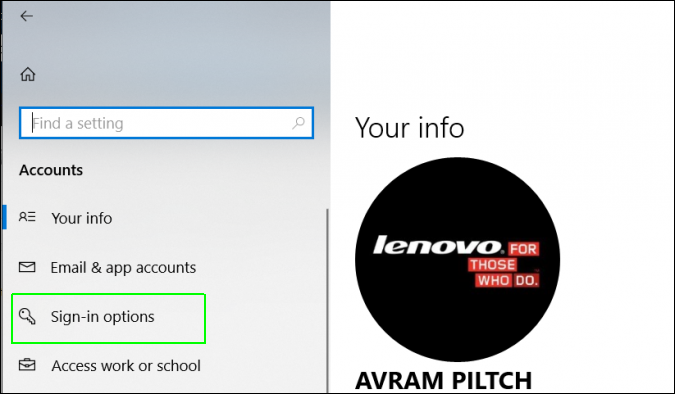
3. Select Sign-in options.
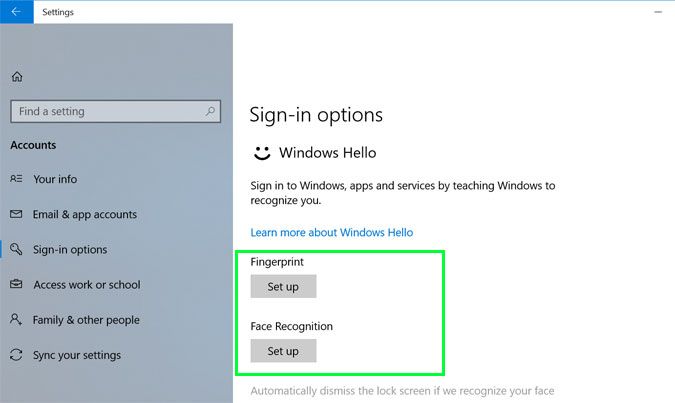
4. Click the Set up button under either Fingerprint or Face Recognition.
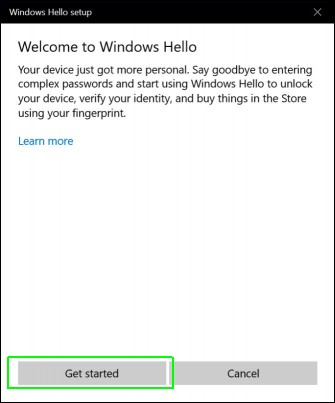
5. Click Get Started.
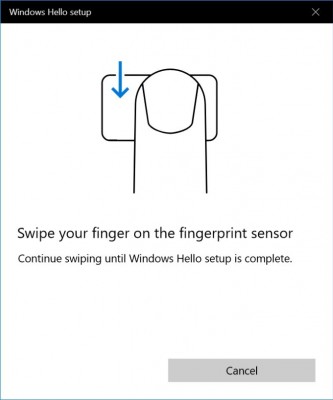
6. Swipe your finger (for fingerprint readers) or stare at the camera (for facial recognition) as directed. If you don't have a fingerprint reader or an IR camera, Windows 10 won't let you proceed.
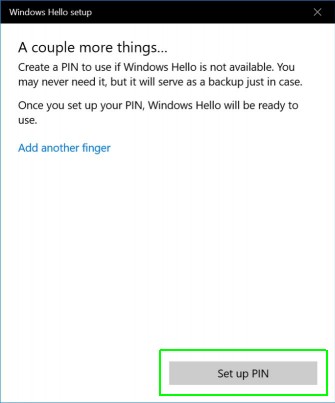
7. Click Set up PIN. Windows 10 requires that you have a PIN as a back up, in case your finger or face doesn't register. You won't be asked to do this if you already have a PIN.
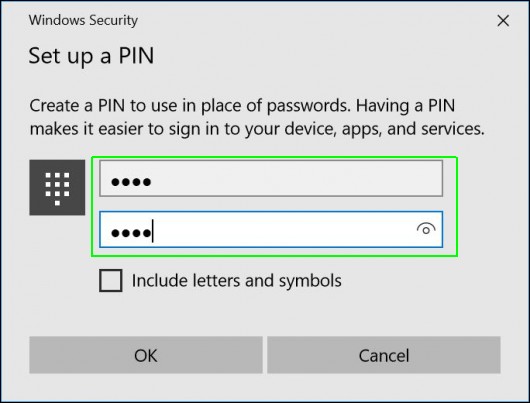
8. Enter a PIN and click OK.
Install your browser of choice (or stick with Edge)
Microsoft's Edge Browser is fast, lightweight and definitely worth considering. However, if you're used to Chrome and Firefox extensions, you'll want your favorite browser right away. To set your new browser as the default, follow these steps.
1. Download and run the browser installer of your choice. Chrome is at https://www.google.com/chrome/browser/desktop/
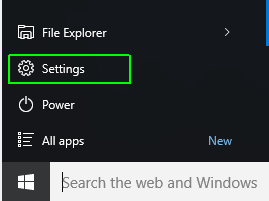
2. Navigate to settings. You can get there from the Start Menu.
3. Click System.
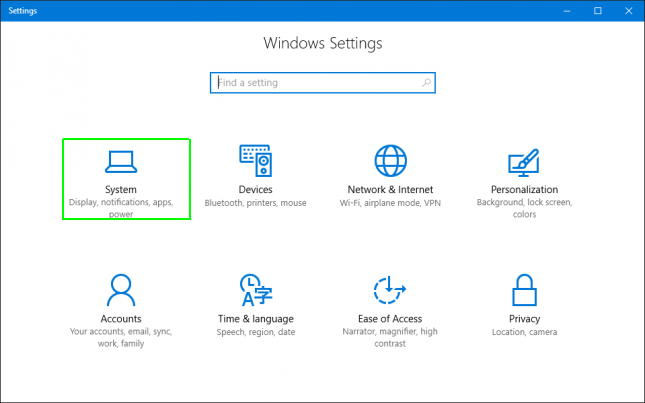
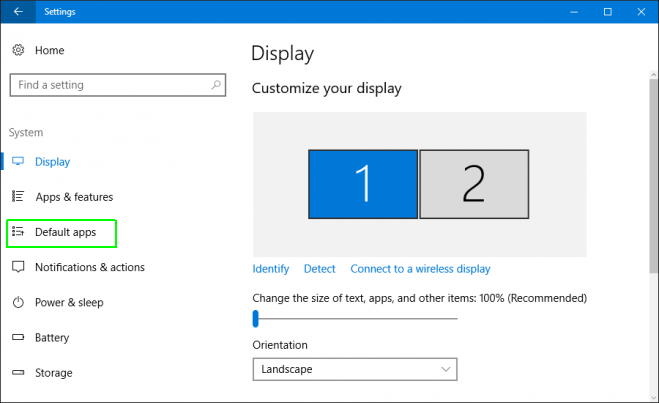
4. Select Default apps in the left pane.
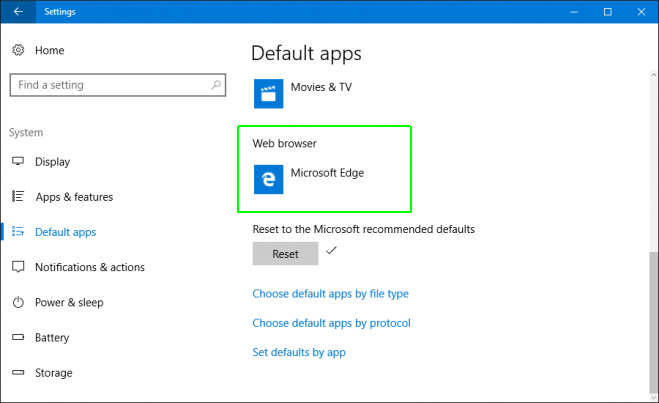
5. Click the icon under Web browser. It may say "Choose a default" or it may have the icon for the current default browser.
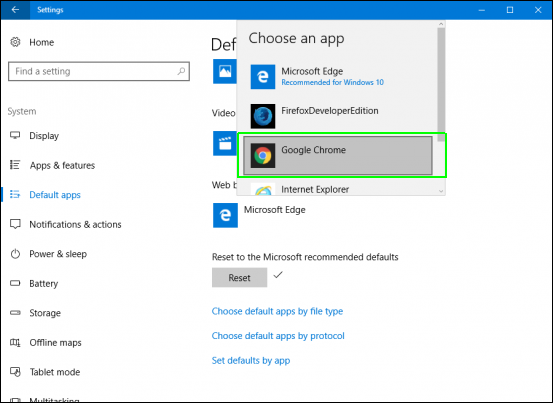
6. Select your browser in the pop-up menu that appears.
Configure Cortana (or turn her off)
Microsoft's built-in digital assistant offers a number of neat features, such as the ability to set reminders, find files by semantic search, answer questions using Bing's knowledge base, perform some voice commands and give you alerts for things like weather and sports scores. If the idea of having a digital assistant appeals to you, you need to activate Cortana and give her some information about you. If you don't want a digital assistant and choose not to activate Cortana, you can still use her search box to find files and apps.
To activate Cortana:
1. Click the search box.

2. Click "Cortana can do much more."
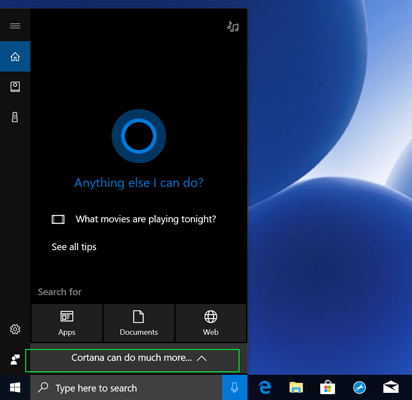
3. Click Sign in.
If you aren't logged in to a Microsoft account, you'll be prompted to sign in, but you should already be logged into Windows 10 with that account (unless you went out of your way to create a local account).
4. Select the notebook icon in the left menu bar that appears when you click the search box.
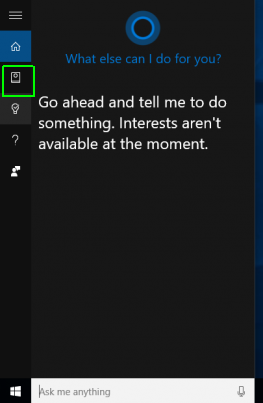
A list of icons appears.
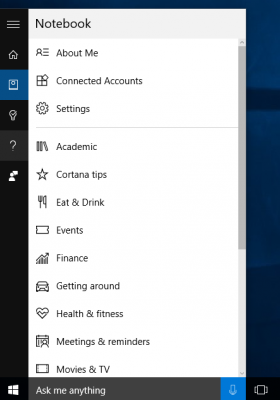
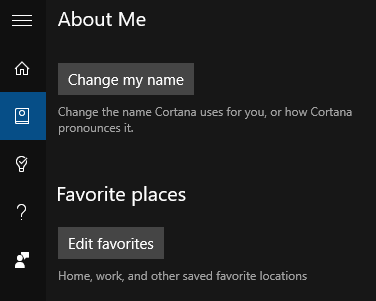
5. Click About Me to enter your name and favorite places (such as work and home).
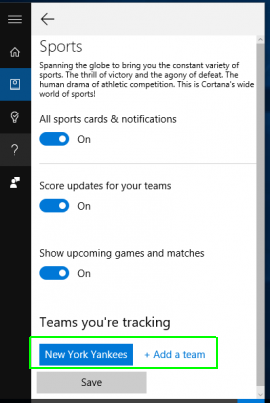
6. Click Sports to tell Cortana what teams you follow.
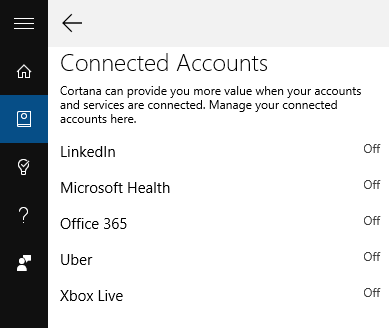
7. Click Connected Accounts to let Cortana access data from other accounts.
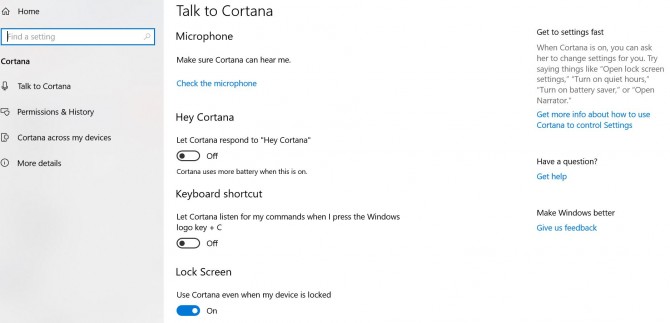
8. To turn Cortana off, click in the search box and press the settings menu on the left side. Under the Talk to Cortana tab, slide the Let Cortana respond to "Hey Cortana" to the left. You can also search "Speed, inking, & typing" in the main search box.
Disable the time-wasting lock screen
Unless you enjoy staring at an attractive photo when you first boot or wake your PC, the Windows lock screen serves absolutely no purpose. Every time you start up, you have to swipe or click on the lock screen photos before you can enter your username and password, but why not just go straight to the login prompt? Here's how to disable the Windows 10 lock screen.
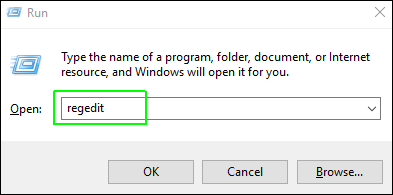
1. Open the registry editor by hitting Windows + R or typing "regedit" into the run box.
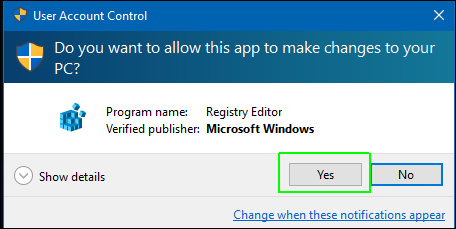
2. Click Yes if prompted by User Account Control.
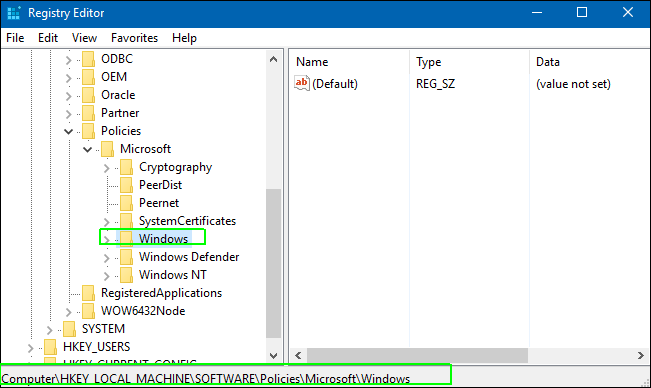
3. Navigate to HKEY_LOCAL_MACHINE\SOFTWARE\Policies\Microsoft\Windows by opening the folder tree in the left window pane.
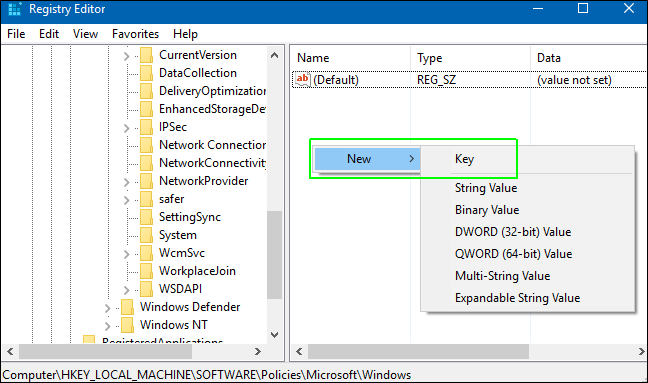
4. Right-click in the right pane and select New > Key. Then rename the key Personalization. Skip this step if a Personalization key already exists under Windows. Note, you won't be able to complete this step without admin privileges.
5. Open the Personalization key.
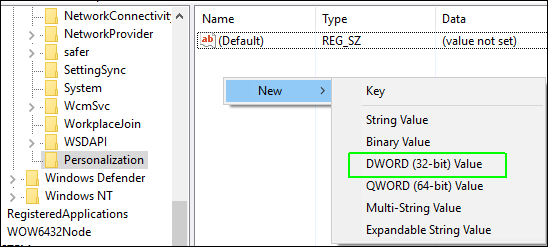
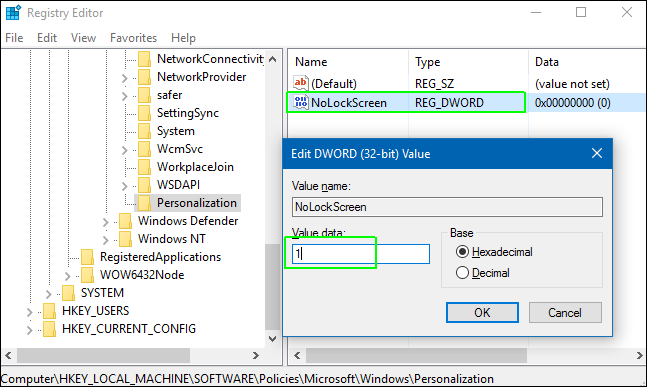
6. Right-click in the right pane and select New > DWORD (32-bit) value. Rename it to NoLockScreen.

7. Set NoLockScreen to 1 by double-clicking on it and entering 1 in the dialog box.
8. Close the Registry Editor and reboot your PC.
Adjust your display scaling
Today many laptops come with high-resolution displays that are sharp and colorful, but have so many pixels that your icons and fonts may appear a little too small out of the box. Conversely, your laptop may have icons and fonts that are larger than you need them to be, potentially wasting screen real estate. You can control the size of desktop objects using a Windows feature known as display scaling. If on-screen content is too small for you, you can turn the scaling up to 125 or even 150 percent. However, if you'd like to fit more on the display at once, you can turn that number down to 100 percent. Here's how.
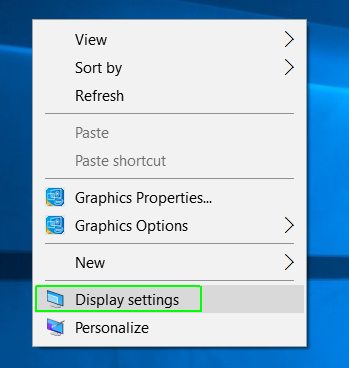
1. Right-click on your desktop and select Display Settings.
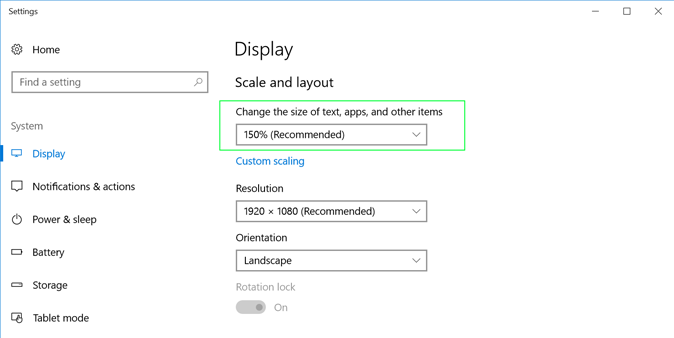
2. Change the menu setting under "Change the size of text, apps . . . " You cannot get any smaller than 100 percent. You will notice an immediate change to the size of some menus.
3. Reboot your computer or log out and log back in.
Set up keyboard shortcuts for every app
You can save a lot of time — at least several minutes a day — by using keyboard shortcuts rather than your mouse pointer to open menus or double-click on an icon. In addition to memorizing the most important built-in Windows keyboard shortcuts along with specific shortcuts for your favorite apps (ex: CTRL+ T opens a new tab in your browser), you can set up hot keys that open your favorite programs. Here's how.
1. Open the run dialog box by hitting Windows + R.
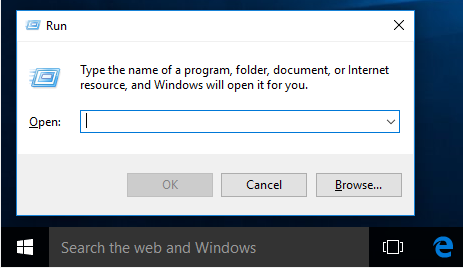
2. Type "explorer shell:AppsFolder" into the box and hit OK.
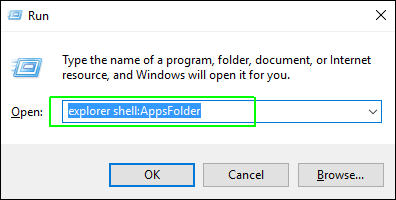
3. Right click on the app you want and select Create shortcut.
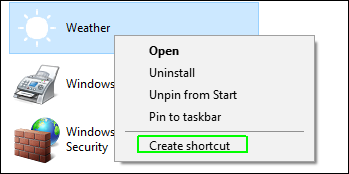
4. Click Yes when prompted. A new icon appears on your desktop.

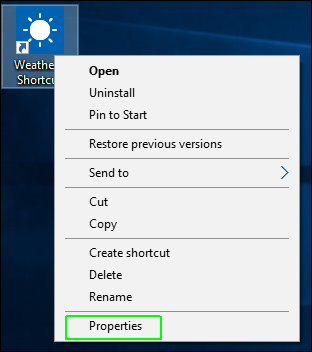
5. Right-click on the new shortcut and select Properties.
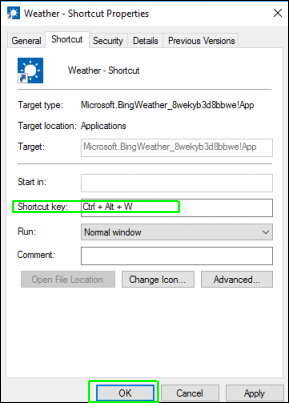
6. Enter a key combination using CTRL + ALT + a Character in the Shortcut key box. You can use letters, numbers or symbols. We suggest using letters that represent the program you're launching (ex, CTRL + ALT + W for Microsoft Word).
7. Click OK.
You can also set up custom keyboard shortcuts for frequent actions (ex, launching your favorite site, pulling down the "crop" option in Photoshop Elements) using a freeware app called AutoHotkey.
Unhide file extensions and hidden files
By default, Windows 10 treats you like an untrustworthy teenager, hiding extensions (ex: .docx, .xls, .jpg) and making system files and folders completely invisible. But seeing the three or four-letter file extensions is particularly important because they let you know exactly what type of file you're looking at. It's not enough to know, for example, that "my-family-vacation" is a picture file; you should know whether it's a JPG, a GIF or a PNG file before you decide to print or share it. By the same token, a myreport.doc can be read by Microsoft Word from 2003 and before but myreport.docx requires newer software.
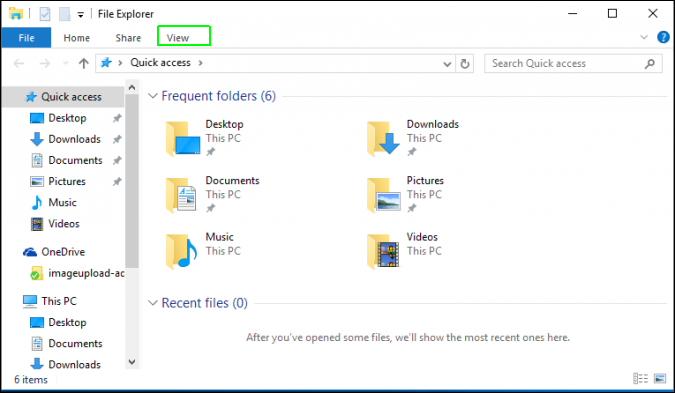
1. Open File Explorer. You can get there by clicking on the yellow folder icon on the taskbar.
2. Click the View tab at the top of the window.
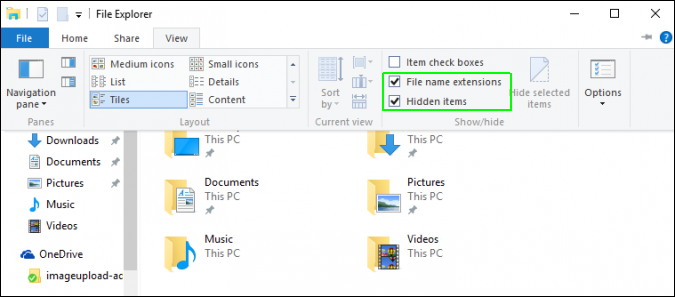
3. Toggle on "File name extensions" and "Hidden items." You will need to hit "View" again after you check the first one.
Change your desktop theme
If you're happy with the wallpaper and color scheme that your computer came with, by all means keep it. However, most may want to personalize Windows 10's look and feel by changing themes. Here's how to customize your Windows 10 theme.
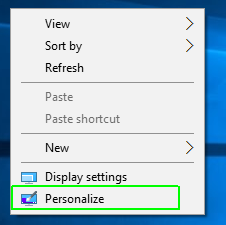
To get started, right-click on the desktop and select Personalize.
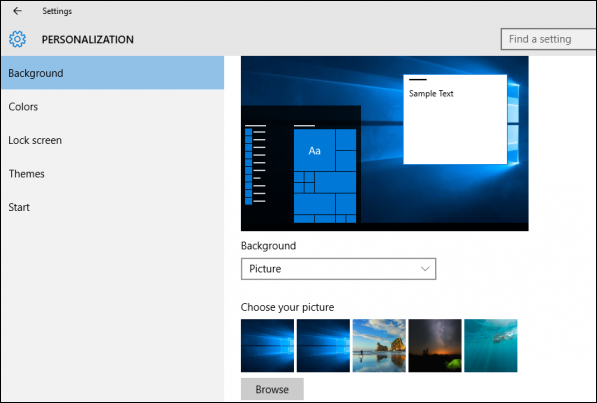
The personalization menu appears.
Desktop Wallpaper
Here's how to change your desktop wallpaper:
1. Select Picture, Solid Color or Slideshow from the Background menu.
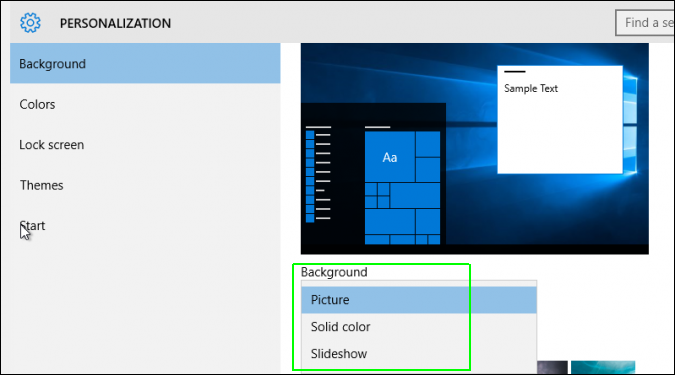
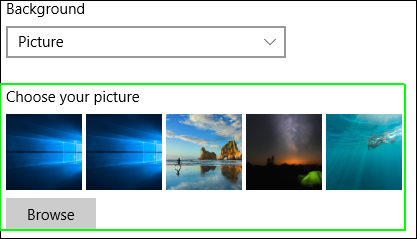
2a. If you picked "picture," select a photo from the list or browse for one on your hard drive.
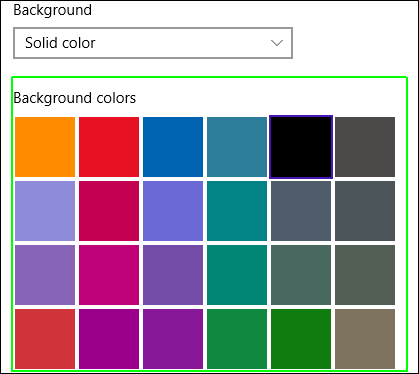
2b. If you picked "solid color," select one of the available shades.
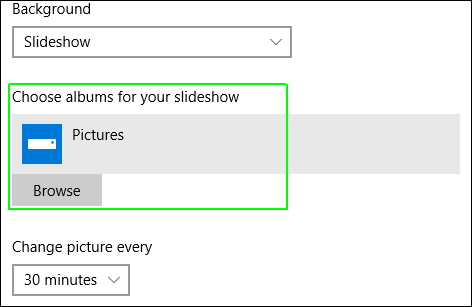
2c. If you chose "Slideshow," decide which folder you want the show to draw from. It defaults to your pictures library.
Dark/Light Mode
Here is how to enable Dark Mode and Light Mode:
1. Open the Settings menu.
2. Click Personalization.
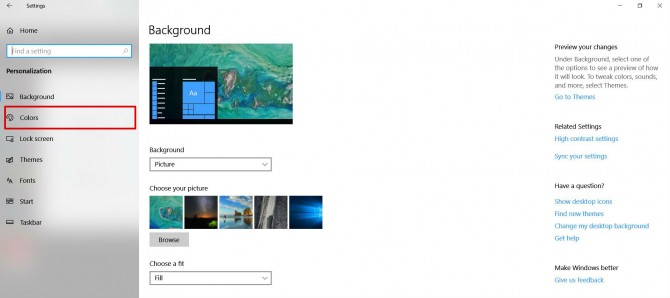
3. Select the Colors tab from the left sidebar.
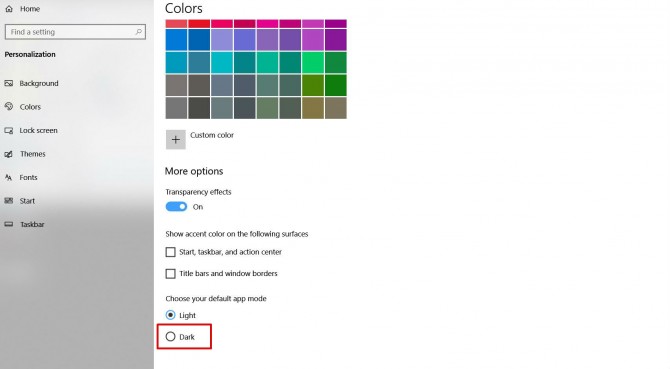
4. At the bottom of the page, choose "Dark." If you want to enable Light Mode, keep the default option selected or press "Light."
Accent Colors
To change the color of your taskbar, window title bars and Start menu:
1. Click Colors in the left nav.
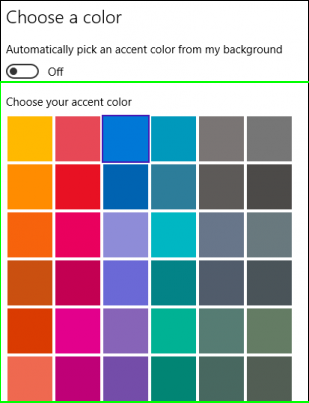
2. Pick a color or toggle "Automatically pick" to on.
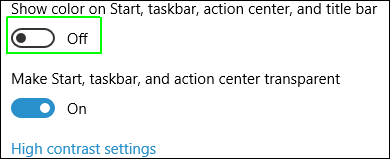
3. Toggle "Show color on Start, taskbar..." to On.
Themes
Rather than tweaking the colors and wallpaper separately, you can choose from a pre-existing Windows 10 theme.
1. Click Themes in the left pane.
2. Choose a theme.
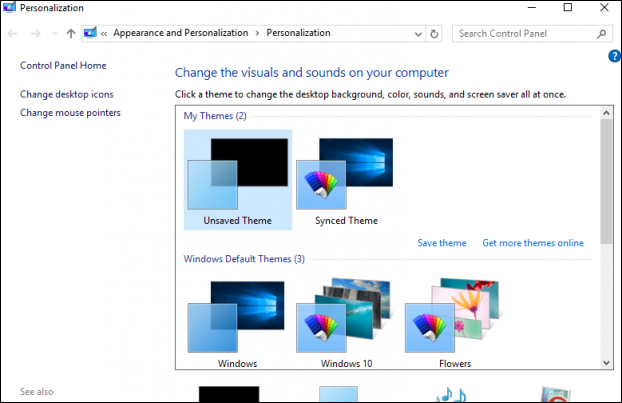
Click "Get more themes online" if you want to download additional options.
Now that you've got your PC ready to go, you might want to password protect a folder in Windows 10 to keep your sensitive files safe or learn how to create a shortcut to a website with Chrome. You can also pin your favorite websites to the Windows 10 start menu for quick access.
Windows 10 basics
- 7 settings to change right away
- Windows 10 keyboard shortcuts to save you clicks
- 5 ways to take screenshots
- Change your password in Windows 10
- Uninstall programs in Windows 10
- Enable or disable tablet mode
- Add a user (child or adult)
- Change the screen resolution
- Sync your settings across devices
- Sync iPhone with Windows 10
- Control Windows 10 with your voice
- Upgrade to Windows 10 from Windows 7 or 8
- Eliminate blue light with night light
- Create a new folder
- Get to the desktop in Windows 10
- Add a printer
- All Windows 10 tips
- Set alarms
