Windows 10 Update Wastes 20GB: How to Get It Back
This month, Microsoft started rolling out its Windows 10 Anniversary Update, a major upgrade to the company's flagship operating system. The update adds several features, including Windows Ink, Cortana Phone Sync and Windows Hello logins for applications, but it also consumes about 20GB in space on your storage drive during the installation process.
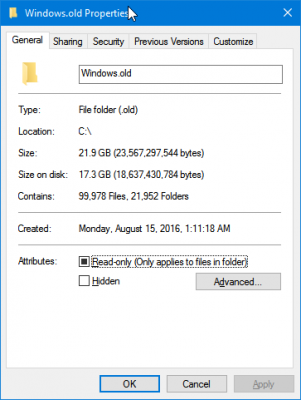
If you recently installed the Anniversary Update, you may notice that your storage drive has 20 to 22GB less space than it did before. The problem isn't with the update itself, but with the old software it leaves behind. Every time you perform a major update -- not a patch, but an actual change to the OS build number -- Windows keeps a backup copy of the old version in a folder called Windows.old on your C drive. Since Windows 10 takes up about 20GB, the backup folder eats up all that space. Upgrading from Windows 7 or 8 to Windows 10 also creates this backup folder.
The reason Windows 10 keeps a backup is to help you roll back to the previous build number in the event that you have a serious problem. In fact, in the case of Anniversary Update, a small number of users who have both SSDs and hard drives, with programs stored on the hard drive, have experienced freezing problems. After 10 days, the Windows.old folder may delete itself -- or it may not.
Unless you have a serious freezing problem, which you would notice right after the upgrade, we recommend that you delete the Windows.old folder to save a lot of space. The OS won't let you just highlight the folder and hit the delete key, though. Here's how to delete the Windows.old folder:
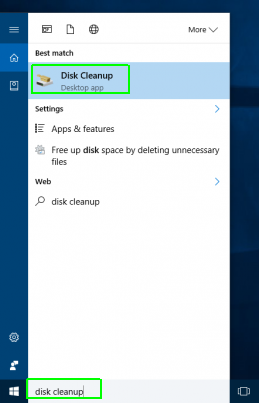
1. Launch Disk Cleanup. You can get there by searching for "Disk Cleanup" in the Cortana box.
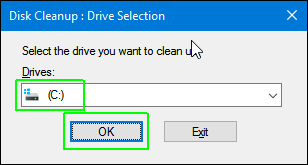
2. Select the C drive and Click Ok.
3. Click Clean up system files.
Stay in the know with Laptop Mag
Get our in-depth reviews, helpful tips, great deals, and the biggest news stories delivered to your inbox.
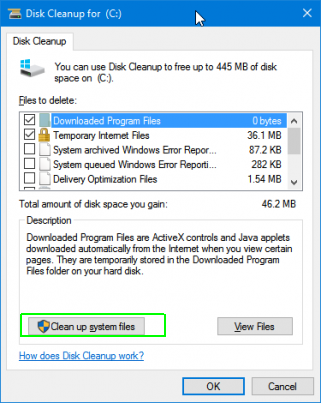
4. Select the C drive again and click Ok.

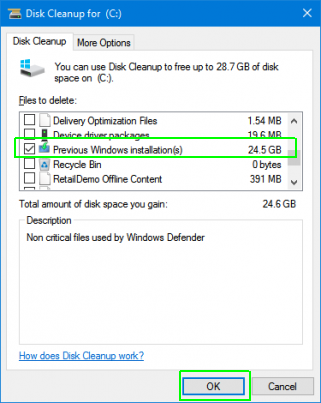
5. Select Previous Windows Installations and hit Ok. You may also want to select all the other items on this list.
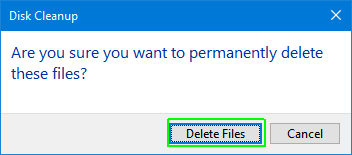
6. Click Delete Files.
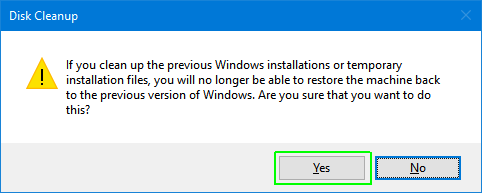
7. Click Yes if prompted to confirm.
You'll have to wait a few minutes for the files to delete, but your C drive will have a lot more space afterwards.
Windows 10 Annoyances and Problems
- Repair Windows 10
- Remove the Lock Screen
- Disable or Enable Grayscale Mode
- Set Compatibility Mode for Apps
- Access the BIOS on a Windows 10 PC
- Stop Windows Update from Automatically Restarting Your PC
- Turn Off App Notifications
- Fix a Slow-Opening Windows Downloads Folder
- Disable Personalized Ads on Microsoft Sites and Apps
- Stop Skype’s Annoying Auto Updates
- Fix a 'Boot Configuration Data File is Missing' Error
- Clear the Run Command's History
- Disable Cortana
- Uninstall and Restore Built-in Apps
- Restore a Missing Battery Icon
- Fix a Boot Configuration File Error
- Get to the Advanced Startup Options Menu
- Delete a Locked File
- Restart without Rebooting
- Roll Back Windows 10 to an Earlier Version
- Disable Automatic Driver Downloads
- Disable Internet Explorer
- Pause Windows Updates for Up to 35 Days
- Use Battery Saver
- Downgrade to Windows 10 S
- Save Netflix Videos for Offline Viewing
- All Windows 10 Tips
- Worst Windows 10 Annoyances
- Disable Password Prompt on Wake

