How to Install an M.2 SSD in the Lenovo ThinkPad T440s
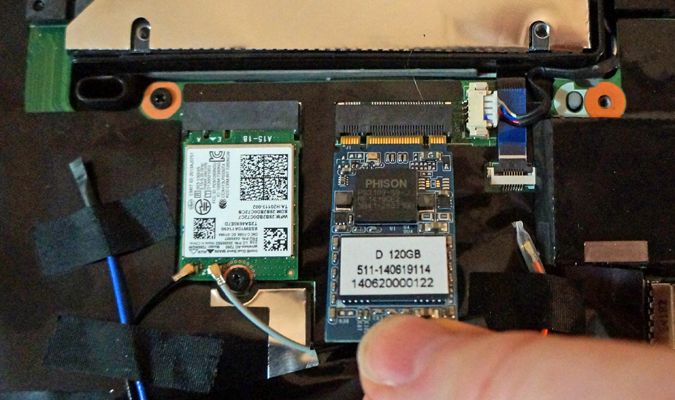
When you think of notebooks with two storage drives, you probably imagine a bulky 17-inch system you can barely carry. However, a number of lightweight laptops, including the 14-inch, 3.6-pound Lenovo ThinkPad T440s, have M.2 (formerly known as mSATA) slots which can be used to install a tiny SSD on a chip. You can pair this second drive with the 2.5-inch hard disk or SSD the T440s came with and even transfer the operating system to it so you can use it as a boot drive. Here's how to install an M.2 SSD in your Lenovo ThinkPad T440s.
Before You Begin
If your ThinkPad T440s has a built-in 3G/4G modem, then the M.2 slot is already occupied and you can't perform this upgrade. If you don't have a modem, but do have a hard drive, you may have a small, 16GB Flash cache chip in the M.2 slot, and you'll need to remove it as part of the installation process.
When buying an SSD, be sure to purchase an M.2 drive that is exactly 42mm long, the only length that will fit in the ThinkPad T440s's narrow slot. Though M.2 is the next-generation of mSATA, it is not backward compatible so you need to make sure the drive is listed as M.2, not mSATA. We used a MyDigitalSSD 128GB drive, which costs $79.99 (Buy at Amazon), but you can also find 64GB or 256GB drives for more or less money. We recommend going with at least 128GB (see our favorite SSDs here). You'll also need a small Philips-head screwdriver.
MORE: How to Upgrade the RAM on the Lenovo ThinkPad T440s
How to Install an M.2 SSD in the T440s
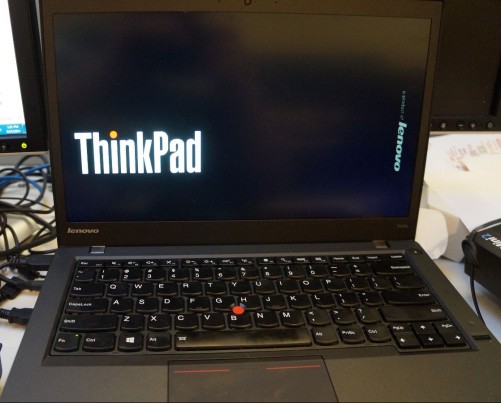
1. Enter the BIOS setup program by hitting Enter repeatedly when the notebook boots. If Windows loads, you'll have to restart and try again.
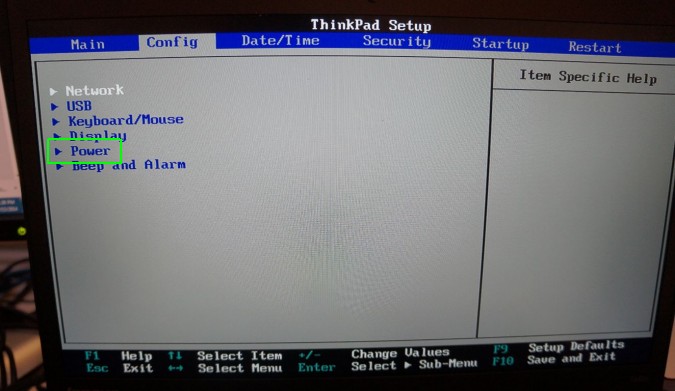
2. Select Power under the Config Tab.
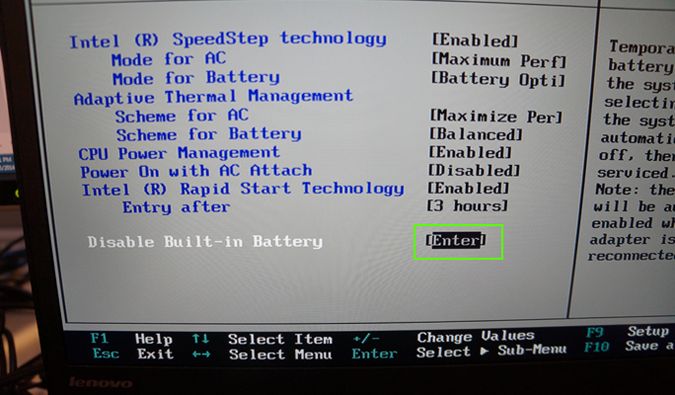
3. Select Disable Built-in Battery and hit yes when asked to confirm. This will turn the computer off.
Stay in the know with Laptop Mag
Get our in-depth reviews, helpful tips, great deals, and the biggest news stories delivered to your inbox.
4. Place the T440s upside down on a table, with the power off and cord unplugged.
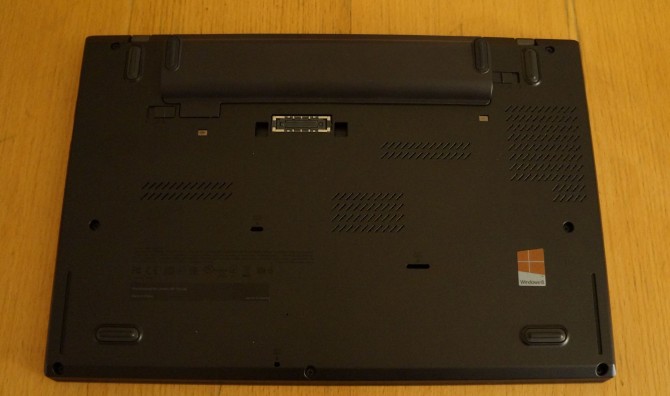
5. Remove the battery by pulling aside the clips.

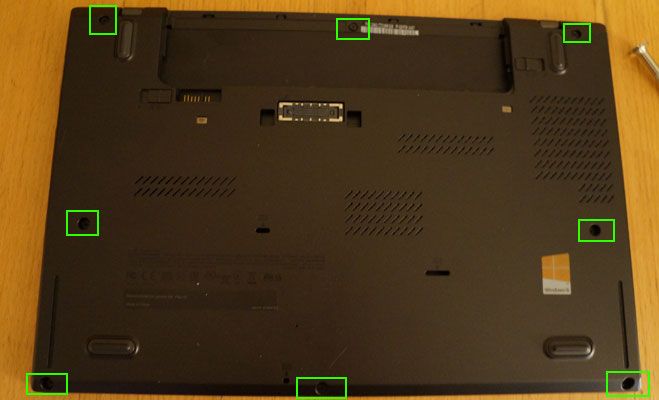
6. Unscrew the 8 screws on the back using the Philips head screwdriver.
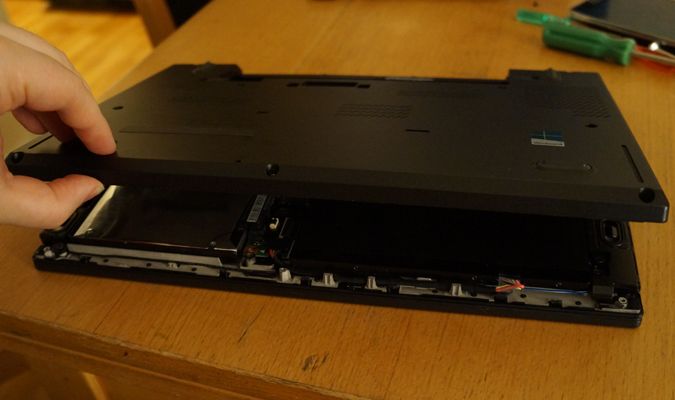
7. Pry the bottom off, starting at the lower left corner, pulling up the bottom, right side, left side and top. Be very gentle, and, if you feel resistance, make sure all screws are completely loose.
8. Locate the M.2 slot on the left side of the system, just above the hard drive bay, and fold back the plastic strip on top of it, without removing it permanently.
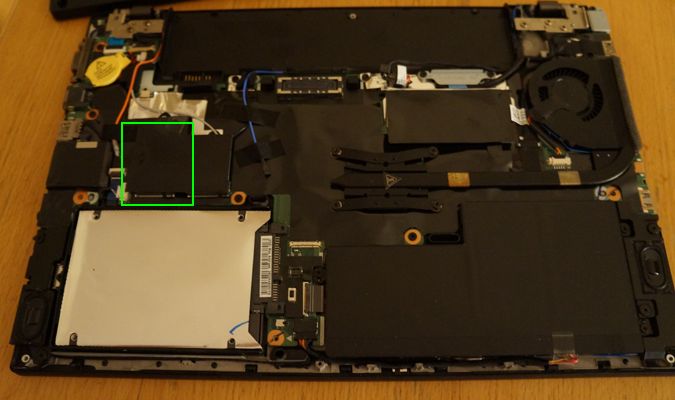
9. Remove the current Flash cache chip, if there is one, by unscrewing it and sliding it out of the slot.
10. Slide the M.2 SSD into the slot, aligning the teeth on the chip with the grooves on the receptacle.
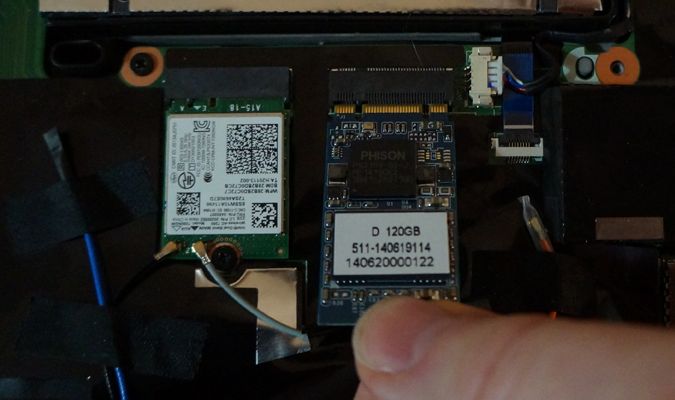
11. Put a screw in the hole just below M.2 stick and tighten it so that holds the SSD in place. If you don't already have an appropriately-sized screw, your SSD should come with one.

12. Put the back cover back on and tighten all screws.
You should now have an additional drive, but you'll need to either format it to use it for data or copy your entire Windows operating system to it so you can use it as a boot drive.
MORE: Windows 8.1 Tips and Tutorials
How to Copy Windows to the M.2 Drive
If your 2.5-inch drive is a mechanical hard drive, the M.2 SSD will be a lot faster so you may want to use it as your boot drive. In order to do that, you'll want to clone your original drive so that Windows and all your programs get copied over. Before you do, you'll want to make a full system backup, just in case something goes wrong.
1. Install EaseUS Todo Backup Free and EasyBCD.
2. Reduce the amount of data on your 2.5-inch drive to 128GB or less, depending on the size of your M.2 SSD. Since you will be cloning the whole drive, you need to make sure you don't have more data on the source drive than the target. So backup media files until after the cloning. Alternatively, you can put all your media files on an alternate partition you don't clone, but that adds some complexity.
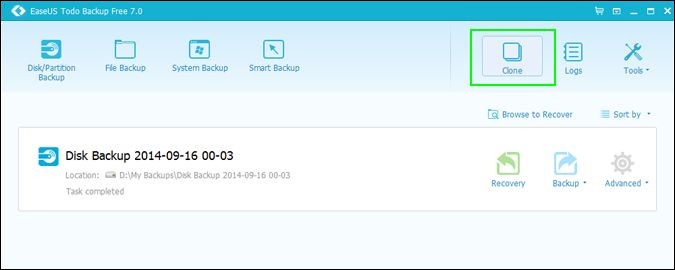
3. Launch EaseUS Todo Backup.
4. Click the Clone button in the upper right corner of the window.
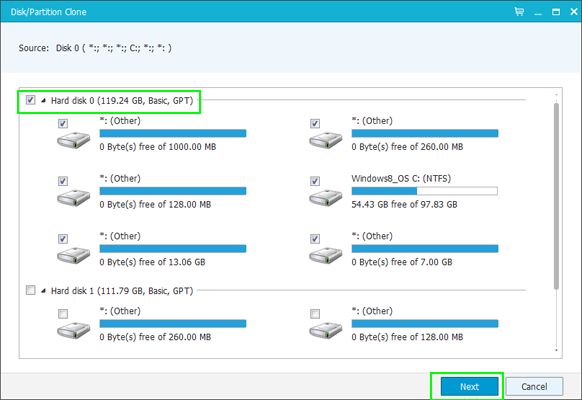
5. Select the source drive by checking the checkbox near Hard disk 0 (zero), which will choose all partitions on the 2.5-inch drive, and click Next. There will be a number of recovery and other small partitions that you may not recognize but you should leave those checked. If one of the partitions has nothing but your media files on it, you can skip it, but otherwise we recommend letting the program clone all of the partitions.
6. Select the destination drive, Hard Disk 1, and click Next.
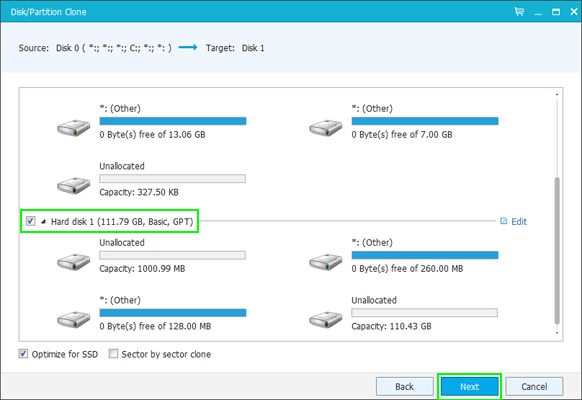
7. Click Proceed.
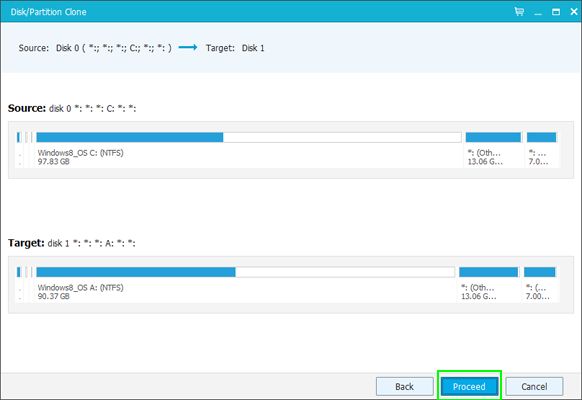
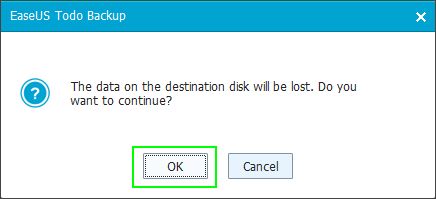
8. Click OK when the software warns you that you'll lose data on the destination disk. The cloning process will begin and could take anywhere from 10 minutes to an hour.
9. Close EaseUS Todo Backup after the cloning is done.
10. Launch EasyBCD.
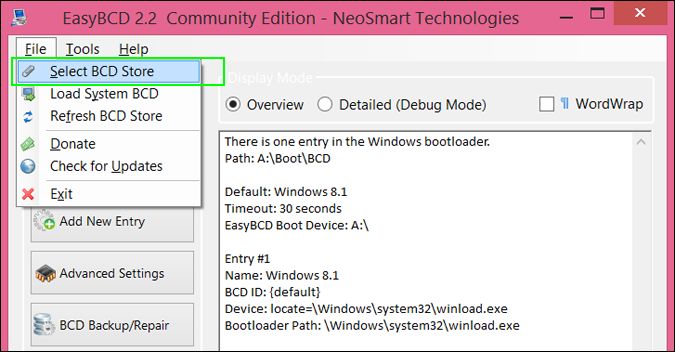
11. Choose Select BCD Store from the File menu.
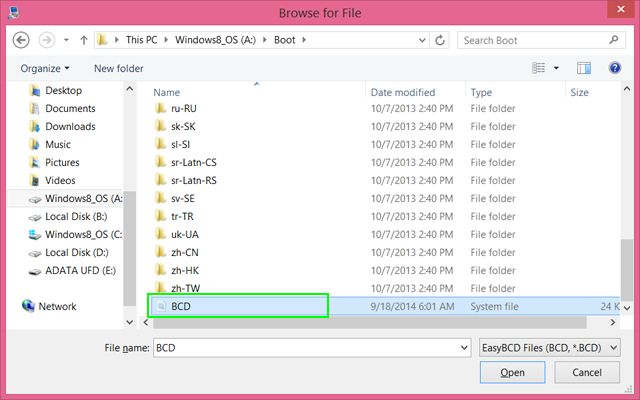
12. Navigate to the M.2 Drive (A: in this example) and select the BCD file from the /Boot folder. If you can't see the /Boot folder, make sure to enable "Show hidden files, folders or drives" in Folder options under the Control panel. The program will load the settings from the M.2 Drives' boot file.
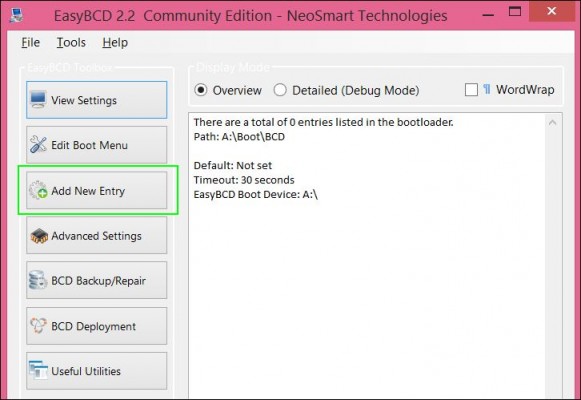
13. Click Add New Entry.
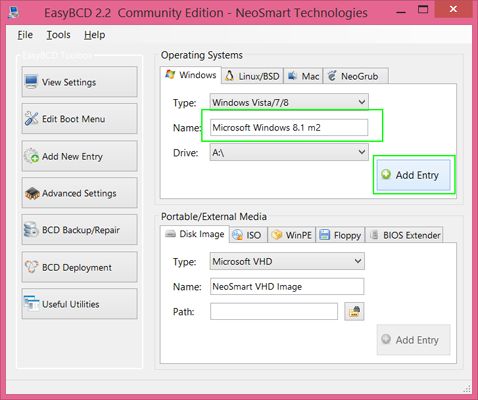
14. Enter a name for your M.2 drive (ex: "Windows 8.1 M.2"), select drive letter and click Add Entry.
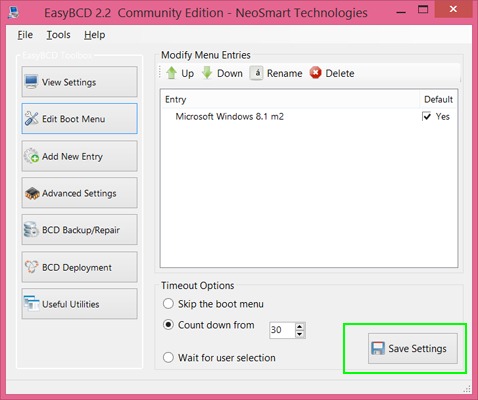
15. Select Edit Boot Menu, make sure your new entry is set as default and click Save Settings.
16. Enter the BIOS Setup program after rebooting the T440s.
17. Select Boot from the Startup tab.
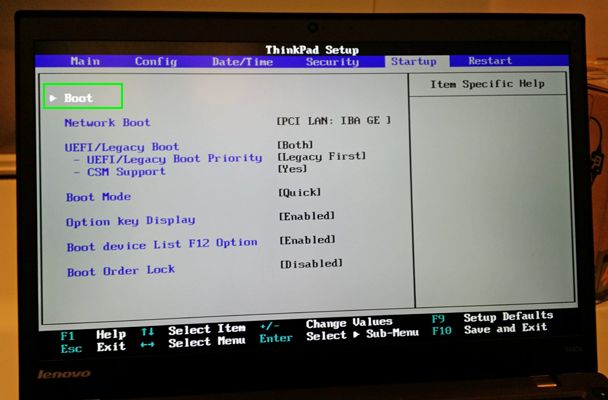
18. Move the M.2 Drive to the top of the boot order. The drive is usually labeld as AT HDD1. You can move it up by highlighting it and hitting the + button.
19. Hit F10 to save and exit.
Your ThinkPad should now boot off the M.2 drive. You should be able to erase the Windows folder from your original drive or even reformat it.
- How to Use the Windows 8.1 Start Button
- Make Windows 8 or 8.1 Look and Feel Like Windows 7
- How to Use Split Screen Mode in Windows 8.1
Laptop Upgrade Guide
- How to Tell If You Can Upgrade Your Laptop
- How to Install an mSATA SSD Boot Drive
- How to Upgrade Your Laptop’s Hard Drive to an SSD
- How to Upgrade the RAM on the Lenovo ThinkPad T440s
- How to Upgrade the RAM (Memory) on a Laptop
- How to Upgrade the SSD in Your MacBook Pro
- How to Upgrade Your Alienware 17’s SSD and Hard Drive
- How to Upgrade Your Alienware 17's RAM
- How to Upgrade Your Dell XPS 13's SSD
- How to Upgrade Your ThinkPad 13's RAM
- How to Upgrade Your ThinkPad 13's SSD
- How to Upgrade Your ThinkPad T460s' RAM
- How to Upgrade Your ThinkPad T460s' SSD

