How to boost your Chromebook’s Wi-Fi performance
Speed up the Wi-Fi connection on your Chromebook with these helpful tips

Your Chromebook is built for surfing the web. Its strength lies in the browser and, therefore, it works best when you’re online. This means a choppy Wi-Fi connection can seriously cripple your overall Chrome OS experience.
It’s common for some Chromebooks to suffer from network issues due to low-end connectivity hardware equipped in the interest of cost-effectiveness. Fortunately, Chrome OS offers a range of options that can diagnose your connection and patch any glitches that may be impeding your Chromebook’s network performance. Here’s how to get started.
1. Diagnose your connection
Your first step to fixing your Chromebook’s patchy network is to ensure it’s not suffering from any snags at your service provider’s end. To do that, you can take advantage of Chrome OS’s dedicated Connectivity Diagnostics app.
Head over to the Chrome Web Store and download the “Chrome Connectivity Diagnostics” extension. As soon as you launch it, it will immediately begin running a network test. When that ends, the app will tell you which tests your connection passed and which ones it failed.
If it displays a “Your network connection appears to be operating correctly,” you’re all good to go. In case it doesn’t, scroll down the app to find the root problem and get in touch with your service provider for a solution.
2. Pick your preferred network
Once you’ve confirmed that your network is fine and your laptop may be at fault, it’s time for you to try customizing a few Chrome OS preferences.

First off: Make sure your Chromebook isn’t constantly attempting to spot a better network in your vicinity. This can happen in areas where there are several open, public Wi-Fi hotspots available. When this happens, your Chromebook will keep dropping your preferred connection to connect to a different one.
Stay in the know with Laptop Mag
Get our in-depth reviews, helpful tips, great deals, and the biggest news stories delivered to your inbox.
In order to prevent this, Chrome OS allows you to pick a preferred network.
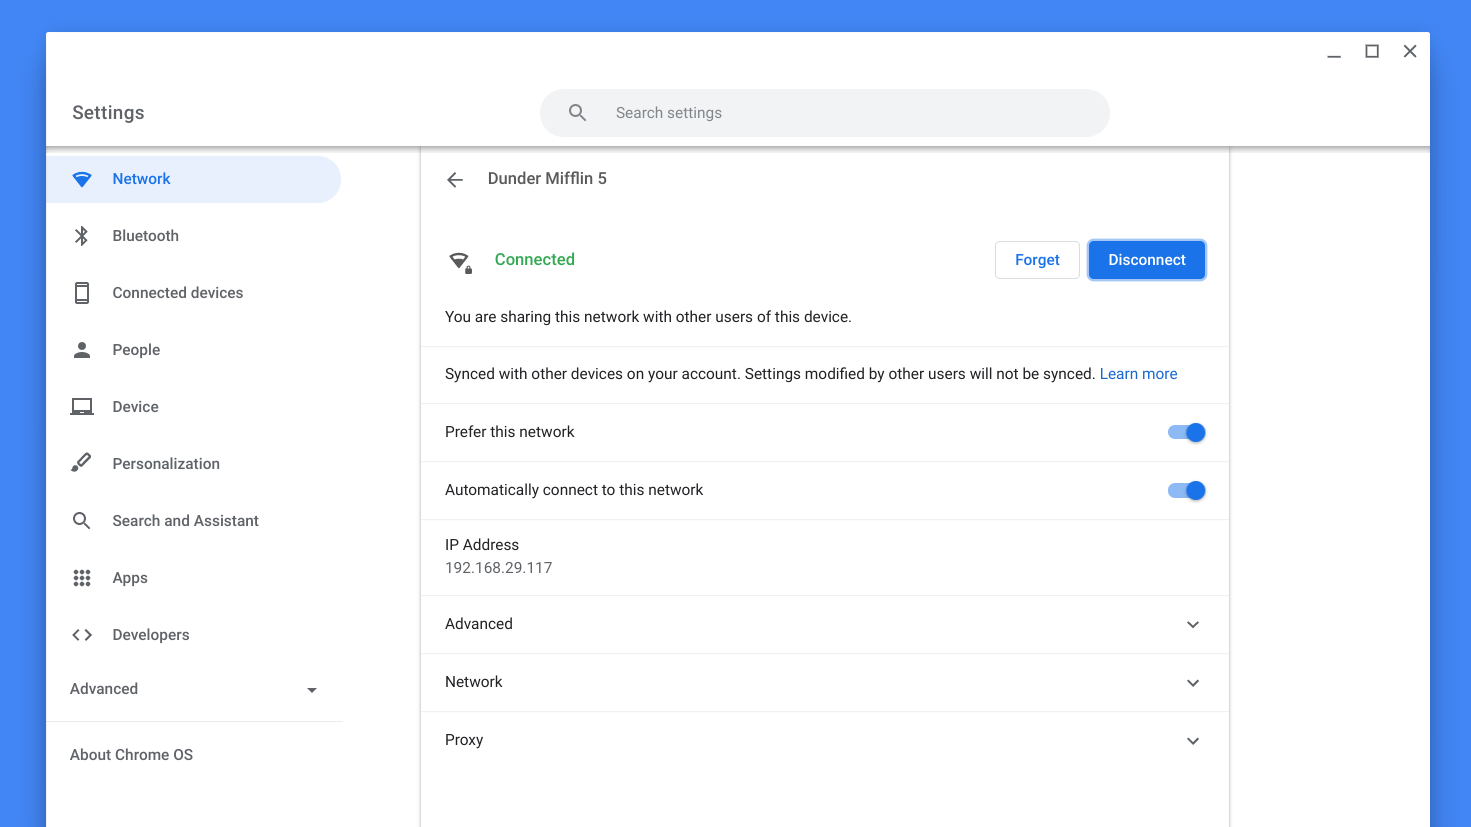
Connect to your Wi-Fi and go to Settings > Network > Wi-Fi. Click on your network’s name and toggle the “Prefer this network” option. Now, when your connection of choice is around, your Chromebook will be locked to it.
3. Switch to Google’s DNS
The Domain Name System (DNS) is a key module of the web’s infrastructure. You can think of it as the internet's phonebook and it enables the browser to understand the website addresses you enter. So you can imagine the amount of DNS lookups your Chromebook performs every day. Hence, an inefficient DNS could dramatically degrade your browsing speeds.
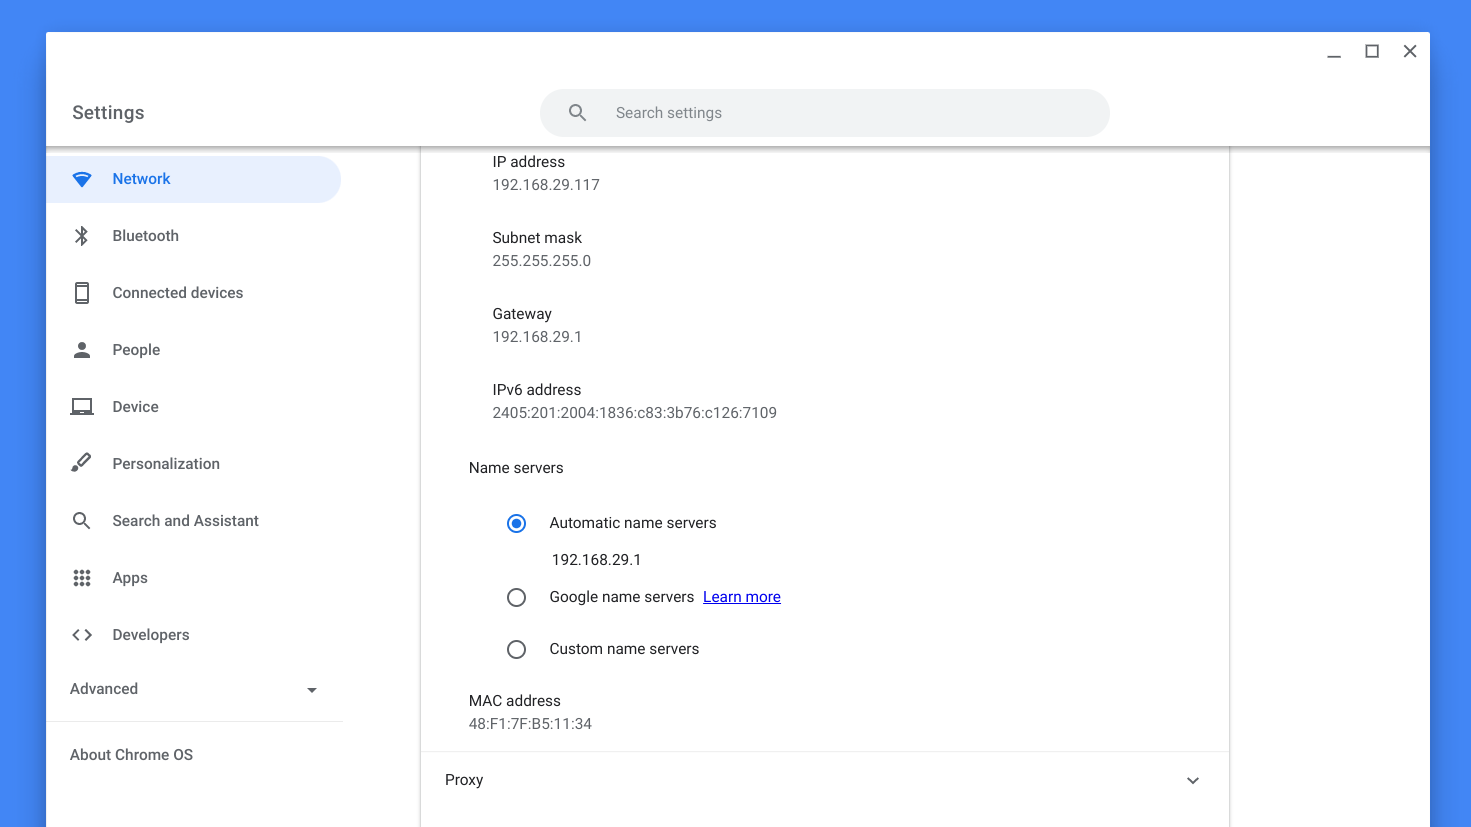
Service providers are notorious for bundling a poor (and in most scenarios, insecure) default DNS and it’s always better to switch to an external one. You can easily configure a new DNS on your Chromebook, but your best bet is to choose the preinstalled one.
Visit Settings > Network > Wi-Fi and select your connection. Click “Network” and under the “Name servers” section, enable “Google name servers.”
4. Get rid of heavy and suspicious extensions
As a Chromebook owner, you probably rely on dozens of third-party browser utilities. Therefore, if you’re actively facing network drops, it might be worth reviewing your list of installed Chrome extensions. Malicious add-ons have been known to slip through the Chrome Web Store’s moderation. Many of these shady extensions can hog your bandwidth for covertly siphoning up your browsing data or for purposes like cryptojacking.
You can enter “chrome://extensions/” in Google Chrome’s address bar to view all your extensions.
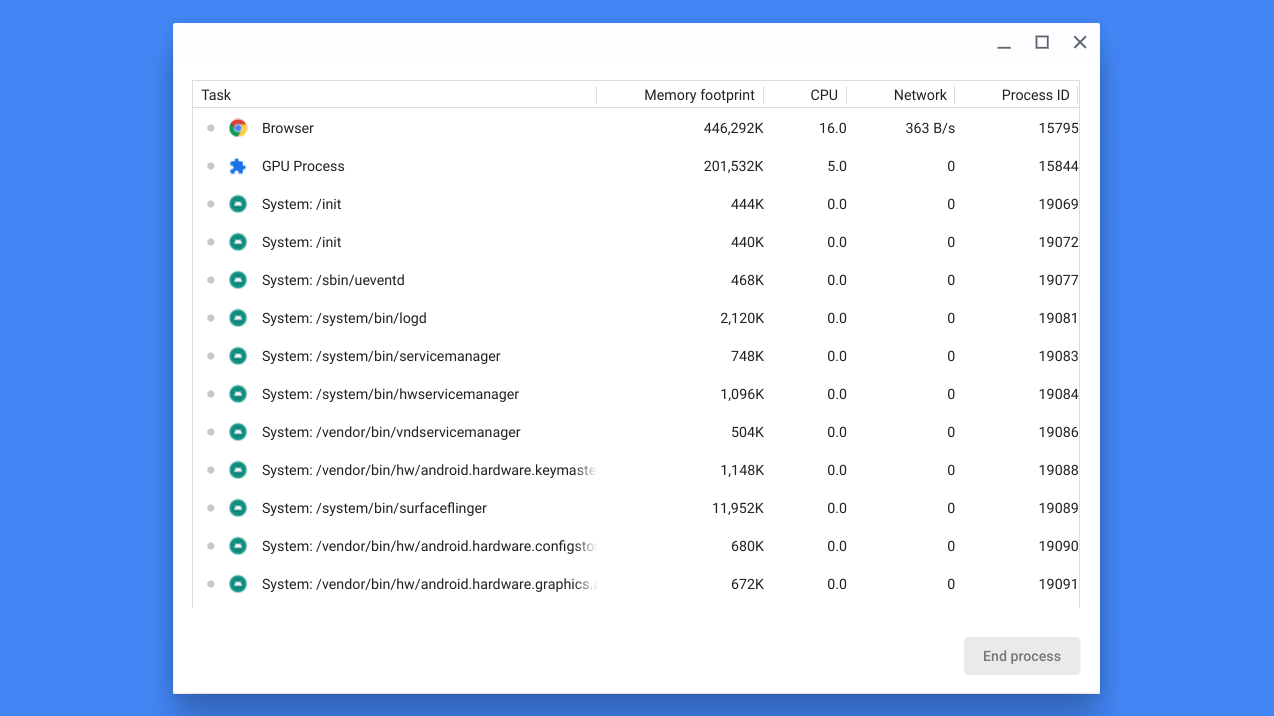
Alternatively, you can press the “Esc + Search” shortcut to pull up the task manager. From the task manager, you can check whether any of your extensions are exchanging more bytes with a server than normal from the “Network” column.
5. Boost your web browsing speeds with Chrome settings
Your Chromebook can’t magically upgrade a sluggish network that’s struggling to keep up with your workflow. You can, however, customize a couple of Google Chrome’s settings to boost how quickly web pages load on your computer.
Launch the Google Chrome browser and click the three-dot menu at the top right. Head into Settings > Privacy & Security > Cookies and other site data.
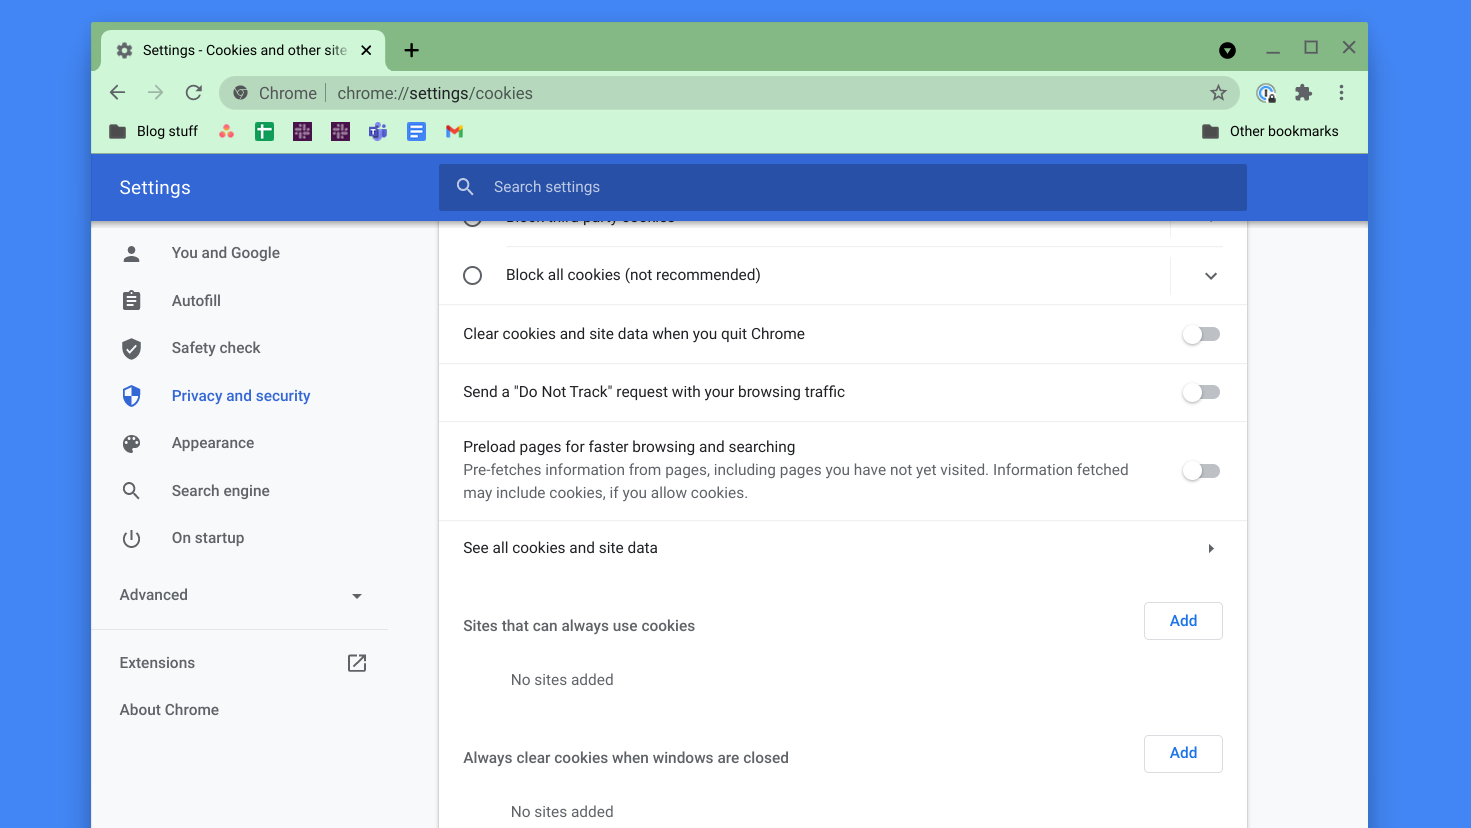
Scroll down to find the “Preload pages for faster browsing and searching” toggle. When you activate this, Google Chrome crawls through any website you’re browsing and preloads the links it thinks you may click on next based on your browsing habits. That way, if you actually do decide to visit any one of such links, it will render in an instant.
You can also choose to turn off all images by default to further speed up your browsing. Once enabled, Google Chrome will no longer automatically fetch a website’s pictures and only display the text and other graphics. Although this is a bit extreme, many sites are laden with unnecessary pictures that often just end up slowing down your network. If you really want to see images, you’ll still have the option to manually load anything you want to see.
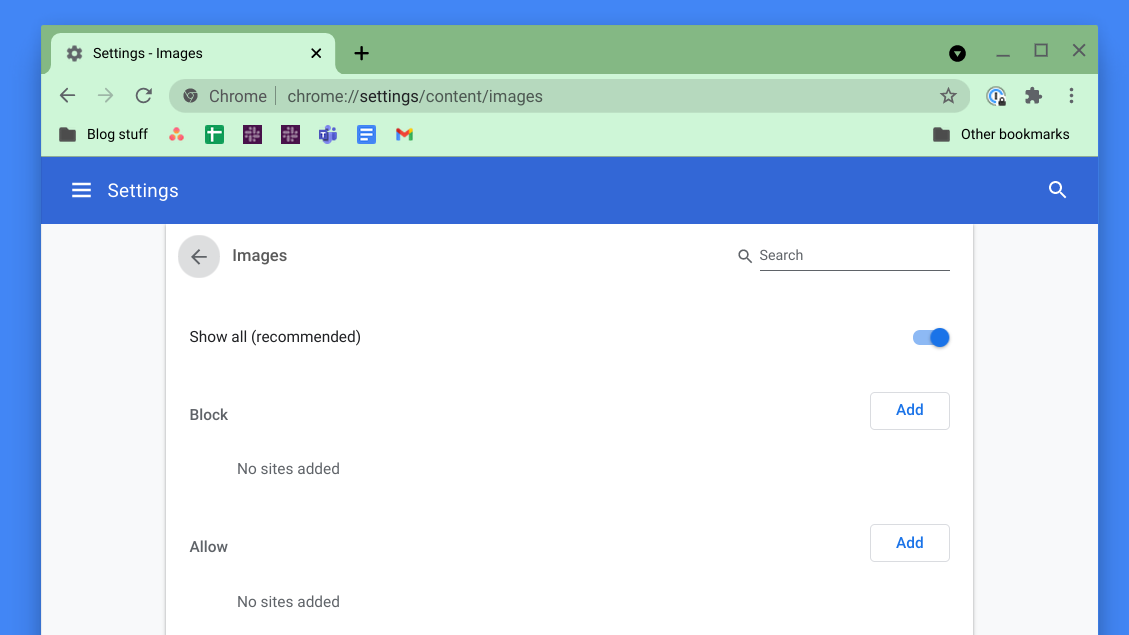
Visit Settings > Privacy and Security > Site settings and under the Content menu, click “Images.” Switch off the “Show all” button.
6. Update Chrome OS
Another potential reason for your Chromebook’s Wi-Fi troubles could be outdated software. Routers actively receive new firmware to support the latest protocols and security patches. If you haven’t updated your Chromebook in a while or if it’s simply nearing the end-of-life date, it’s possible there is an incompatibility issue with the router.
Your last resort, therefore, is to download any pending updates on your Chromebook. You can check this by heading into Settings > About Chrome OS.
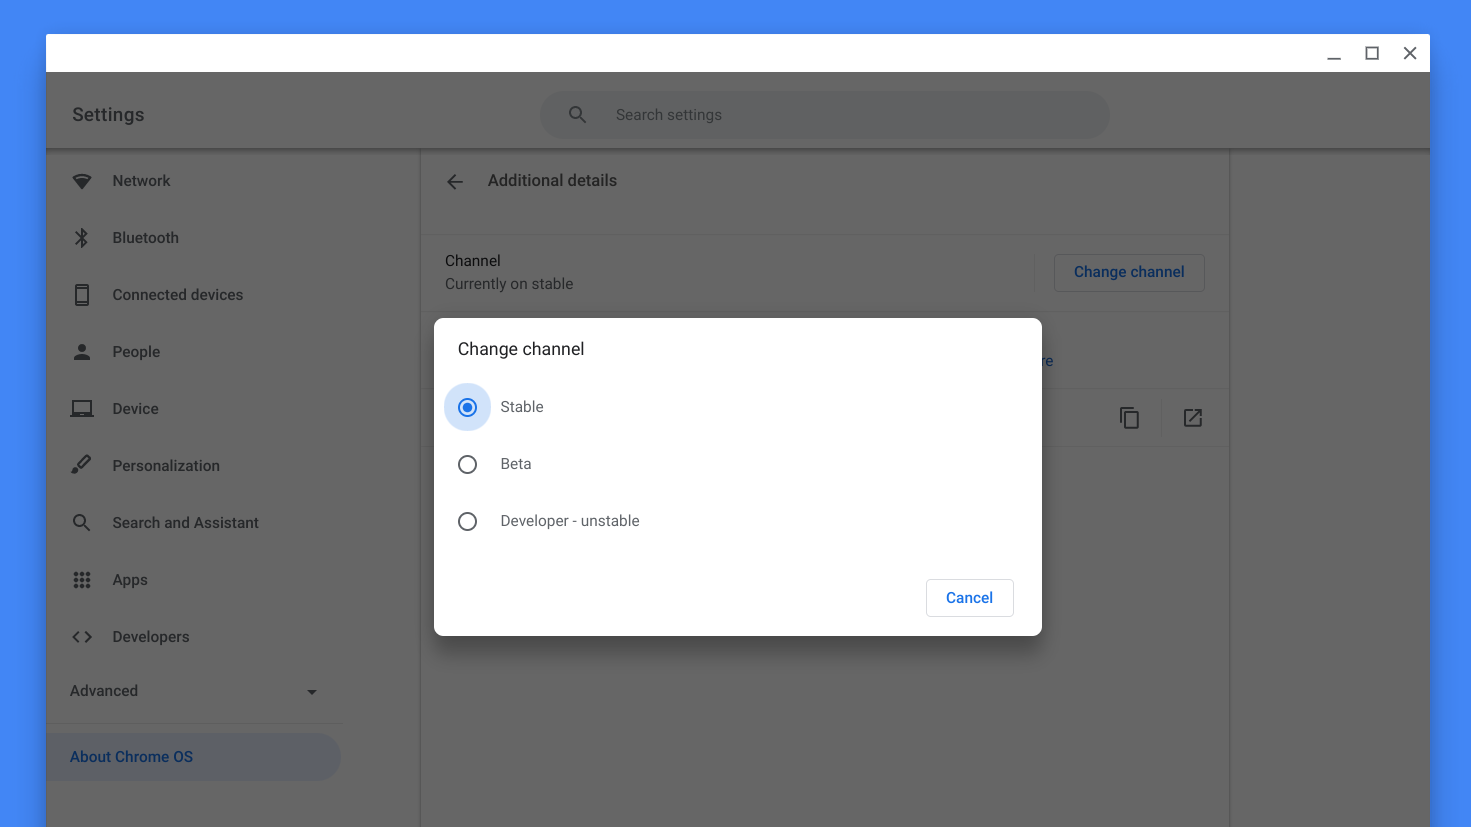
In case there are no new releases available for your laptop, you can also consider grabbing a beta release to see whether it impacts your network performance. To do that, open the “About Chrome OS” menu again and select “Additional details.” Hit the “Change channel” button and click “Beta.”
Shubham Agarwal is a freelance technology journalist from Ahmedabad, India. His work has previously appeared in Business Insider, Fast Company, HuffPost, and more. You can reach out to him on Twitter.
