How to make Chrome use less RAM
Get your RAM back
Google Chrome is the most popular internet browser for Windows users. It’s also notorious for eating up system resources the moment you boot it up. Among these resources is the computer RAM. Fortunately, there are some tricks to reduce the amount of Google Chrome uses and keep your laptop from sounding like it’s seconds from lift-off.
RAM or random access memory, is temporary storage. It’s the storage needed to launch applications, files, and other computer programs. Think of it as a capacitor that stores power before a battery starts dishing it out where needed. The battery, in this case, is your PC’s internal memory, whether HDD or SSD. This quick-throttle approach allows you to launch files, folders, and applications without waiting for your internal memory to sift through thousands, or millions, of other files. Unfortunately, some programs use more than their fair share of RAM, leaving little for other programs.
Enter Chrome. Chrome is a RAM hog that only gets worse the more you use it. As you begin to accumulate extensions, themes, and applications, for example, Chrome only gets slower, and louder – we’re all familiar with the laptop fans going berserk when launching Chrome, right?
Why does Chrome use a lot of RAM?
Chrome is an excellent web browser. It’s easy to see why anyone would want to use something so customizable that has become the standard by which most websites are built and tested. Naturally, the only way it can achieve a lot of the things it does really well is by making a land grab for the resources it needs to do so. Among these resources is RAM. And Chrome needs a lot of it… though it’s improved, slightly, in recent years.
If you open your Task Manager while using Chrome, you’ll notice multiple Google Chrome processes running. The reason is that it creates a separate process for every tab, extension, and plugin running. Doing so increases the system's stability because each tab is independent of the others. Even if one crashes, the other tabs keep working. This is one of the features we love about Chrome, crashing one tab or extension, for example, doesn’t crash the browser. But that comes at a cost.
Another benefit of separating processes is increased security as data from each tab is not shared without permission. Unfortunately, multiple processes mean Chrome has to duplicate many of its background tasks. It is similar to opening the same program multiple times, thus requiring more RAM.
How to reduce Chrome’s RAM usage
Many Chrome users have a love/hate relationship with the software. It delivers speed and simplicity that revolutionized internet surfing, but at the expense of your precious RAM. Upgrading your RAM to somewhere above 8GB can solve this problem. But unfortunately, not everyone has the money to do so.
Stay in the know with Laptop Mag
Get our in-depth reviews, helpful tips, great deals, and the biggest news stories delivered to your inbox.
If upgrading your hardware is not an option, improving how you use Chrome is the way to go. Here are some ways to free some of your RAM while using Chrome.
Close unnecessary tabs
The most obvious way to reduce the RAM used by Chrome is closing unnecessary tabs. If you think you already have the information you need from a website, close the tab for it. Alternatively, you could always aim to use fewer tabs when surfing the internet.
Avoid creating new tabs for every website and web page you visit. Your computer takes time to clear RAM used by a process. The earlier you close a tab, the quicker you can free more RAM. If you really need to come back to a website every now and then, opt to create a bookmark for it. That way, you never lose it, but it does not continuously use system resources.
Uninstall old extensions
Extensions are mini-programs that provide additional features not native to Google Chrome. Unfortunately, some old third-party extensions are not updated as diligently as they should be.
Outdated extensions may not work properly with Google Chrome and, in some instances, create process loops that can crash your system. Follow the steps below to uninstall an old Chrome extension.
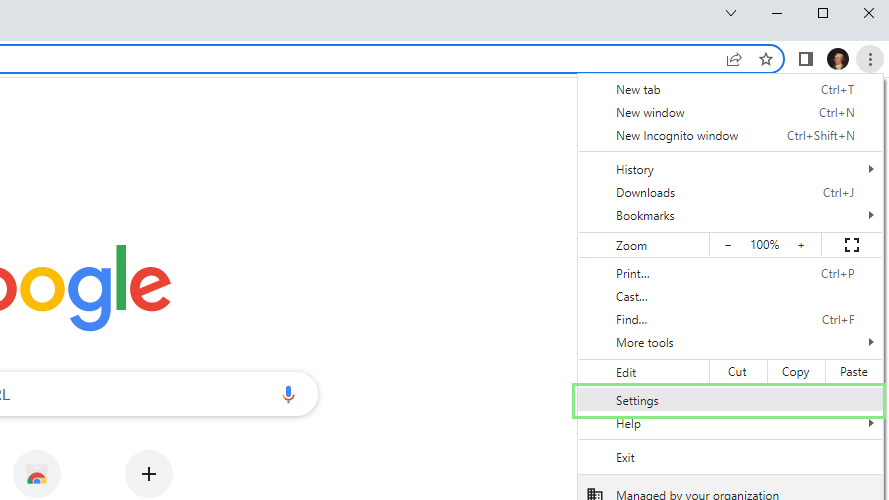
1. Open Google Chrome’s Setting.
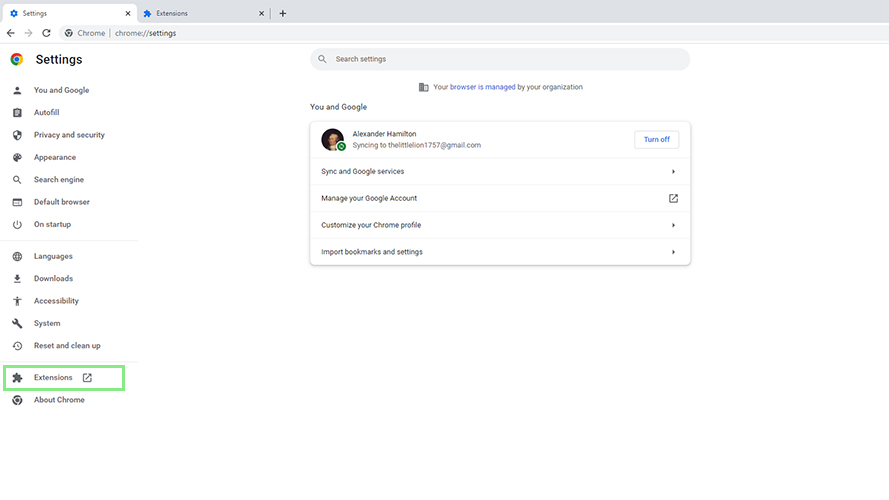
2. Click Extensions on the left-side navigation pane. This will open a new tab that lists all your install extensions.
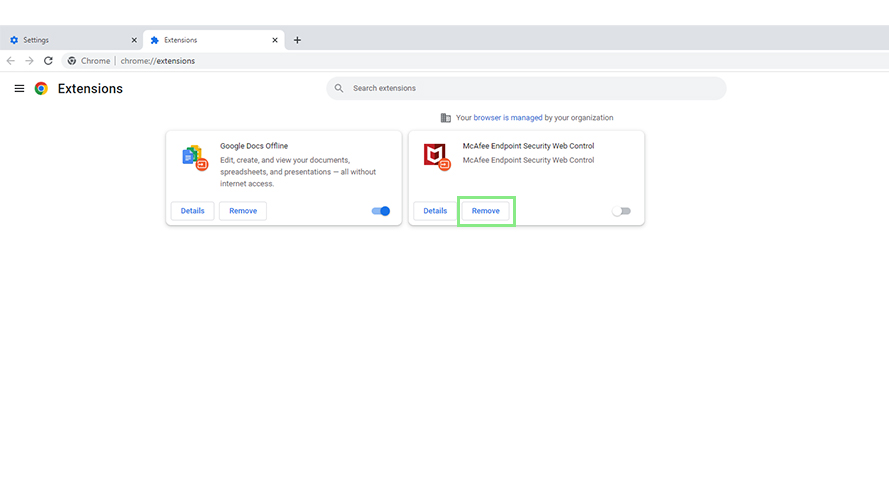
3. Find your old extension and click the Remove button. You can also disable it, but uninstallation is a more thorough and permanent solution.
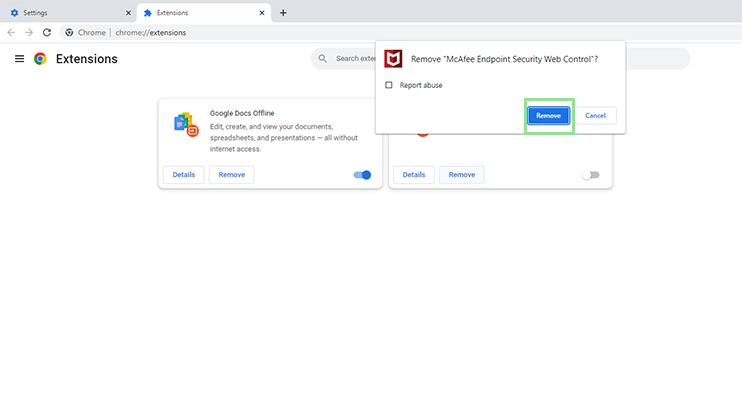
4. Click that you want to delete the extension and restart Chrome.
Run a malware scan for your computer
Some malware viruses are designed to run continuously in the background while Chrome runs. This type of malware became more prevalent after cryptocurrency became mainstream. Crypto mining malware programs use your system resources, including RAM, to solve complex problems. Once solved, the developers of the malware are then awarded cryptocurrencies.
With an updated antivirus program, you can find and delete these viruses plaguing your system. Take note that the best cure for viruses is prevention. Make sure to avoid sketchy websites and never install any programs unless you are confident it is free of malware.
Reset Chrome
If none of the tricks above work, your best option is to reset Chrome. You can either soft or hard reset your browser. To soft reset Google Chrome, Go to Settings > Advanced > Reset and cleanup > Reset settings to their original defaults > Reset settings. Doing this will only undo most of the settings and customizations you have done to your browser. To fully reset (hard reset) your Google Chrome browser, you will need to uninstall and reinstall it.
