5 Ways to Speed Up Your Notebook for Under $100

Love your notebook, but hate how slow it seems? You could spend hundreds or even thousands of dollars buying a brand-new system, but you may not need to.
A simple, sub-$100 upgrade can breathe new life into your aging laptop and allow you to delay purchasing a replacement for a year or more. Here are five of the best ways to make that old notebook run like new again.
Upgrade #1: Move to a 7,200-rpm hard drive
Why You Want It: For many users, the way they measure their system’s performance is how fast it opens and switches apps, copies files, and boots. Since a 7,200-rpm hard drive is 20 to 25 percent faster than the 5,400 rpm hard drive your notebook probably came with, that’s a very noticeable speed improvement.
How To Buy It: Before you buy a hard drive, you need to make sure it’s the right size and interface for your notebook. Most notebooks sold since 2007 have 2.5-inch hard drives with SATA interfaces, but to be certain either contact your manufacturer or open your Device Manager, find the name of your current hard drive, and do a web search to see what type it is. Then head online or to your local retailer to find a 7,200-rpm notebook hard drive. Most models will provide similar performance, but strive for a drive with plenty of onboard cache, preferably 16MB or more. Prices range from $45 for a 160GB drive up to $85 for a 640GB unit.
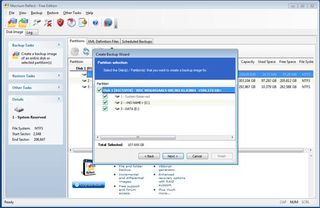
Install It: If you have an external hard drive, you can use Macrium Reflect Free to create a full disk image backup and then restore it onto your new drive. Otherwise, you may want to buy a USB to SATA kit like the Apricorn DriveWire that lets you copy your whole system directly from the old drive to the new one.

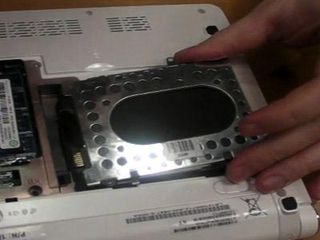
Once you've backed it up, it’s time to swap the drives. Turn off your computer and turn it over. The drive bay is usually located below a panel on the bottom of the notebook that is marked with a cylinder symbol. However, if you can’t find the bay, you may need to consult your instruction manual.
Stay in the know with Laptop Mag
Get our in-depth reviews, helpful tips, great deals, and the biggest news stories delivered to your inbox.

Upgrading your drive is as simple as unscrewing and pulling the original out of the chassis, swapping its brackets or rails onto the new unit, and then sliding the new drive back into the port. After it is installed, you’ll need to restore the disk image onto it.
Upgrade #2: Upgrade Your RAM
Why You Want It: Whether you’re running several browser windows or editing a video while you play a game, you’re using up your system’s resources. In other words, the less RAM you have, the more your notebook has to swap data to your hard drive, causing the whole system to slow down. On today’s laptops, a minimum of 3GB of RAM is essential and 4GB is optimal. Fortunately, adding more memory is cheap and easy.
How To Buy It: Before you buy a RAM upgrade, you need to determine both what kind of memory you need and how many sticks to buy. Aside from your instruction manual, the best way to find out what type of RAM you need and how many slots you have is to use an online configurator like the one on Crucial.com. Most modern notebooks use either DDR2 or DDR3 memory and have one or two slots in total.
Chances are that at least one of your slots already has a DIMM (Dual Inline Memory Module) in it. So, depending on what’s in your computer now, you may need to buy only a single stick of RAM to put in an open slot, or you may need to replace one or both modules you have now so you can reach 3 or 4GB. A single 2GB DIMM costs between $35 and $50, depending on speed and brand. A 4GB kit costs close to $100.
Install It: Consult your notebook’s instruction manual to find the location of your RAM slots. On most notebooks, they are conveniently located behind a panel on the bottom of the notebook. Once you’ve accessed the RAM slots, just insert your new DIMM(s) at a 45 degree angle, while making sure the groove in the connector aligns with the slot.
Once your DIMM is correctly inserted, clips will pop into its side grooves. If you need to remove a pre-installed DIMM, pull the clips outward and it will pop out.
Upgrade #3: Upgrade to a More Powerful Operating System
Why You Want It: Upgrading to a new operating system makes even an old notebook feel new again. However, as of summer 2010, developer site W3Schools.com reported that Windows XP, a nine-year-old OS, remains the most popular operating system, with 53.1 percent of the market, and Windows Vista still remains on 10.5 percent of computers as well.
If you’re using a PC and don’t have Windows 7, you’re really missing out. Windows 7 offers a more responsive system, faster boot times, and a really attractive new interface with features like taskbar preview icons, pinned shortcuts, and Aero snap that actually make you more productive.
How To Buy It: First, check Microsoft’s system requirements to see if your notebook can handle the upgrade. If so, find the lowest price on a Windows 7 Home Premium or Windows 7 Professional. Unless you are using a corporate network, Home Premium will be fine. Get the same bit-version you currently have. That means if you have 32-bit Windows XP or Vista, be sure to get 32-bit Windows 7. Most older notebooks use 32-bit Windows.
Though a home premium upgrade disc typically costs around $110, you can save about $10 by purchasing an OEM or System Builder version of the software from Newegg.com or Amazon.com. The only disadvantage of an OEM version of Windows is that you cannot later transfer it to another PC. You can also save a lot of money if you have a .edu e-mail address and can purchase the upgrade at a student discount from Microsoft.
Install It: If you have Windows Vista, you should be able to upgrade to Windows 7 while keeping your notebook's settings and applications intact. All you need to do is insert the Windows 7 DVD, click Set Up from within Vista, choose an upgrade installation, and follow the instructions.
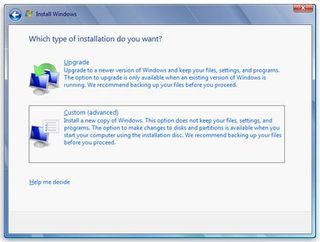
However, if you have XP, you will need to do a clean install, which means you must back up all your data and your application installs before you start the upgrade. Then download, install, and run Windows Easy Transfer, which will help you copy over some of your settings. After you've backed up and copied your settings and software, run the set up DVD, select a Custom Installation, and follow the instructions.

After the install is done you will need to copy back your data and reinstall all of your programs. This is a time-consuming process that could take a couple of hours, but it’s well-worth the improved performance and better user interface.
Upgrade #4: Add USB 3.0 to Your Notebook

Why You Want It: There’s no doubt that USB 3.0 is the future. With ten times the theoretical bandwidth of USB 2.0, we’re going to see more and more USB 3.0 drives over the next year. However, you probably don’t need a new notebook to take advantage of USB 3.0 today. With the right adapter and a new USB 3.0 hard drive, you can get twice the read and write speeds of a standard USB 2.0 back-up drive.
How To Buy It: Not every notebook can be upgraded to USB 3.0, but if you have an ExpressCard/34 slot, you’re in luck. Just go to an online retailer, such as NewEgg or Buy.com, where you can pick up an ExpressCard adapter like the StarTech ECUSB3S2 that will plug right into the slot. However, to take advantage of the speed benefits of US B 3.0, you’ll also need an external hard drive. The least expensive USB 3.0 drives start at around $90 for a 500GB model.
Install It: Adding your USB 3.0 adapter is as simple as popping it into the ExpressCard slot on your notebook and installing the drivers that come with it. Then you’ll be ready to attach any USB 3.0 devices you want.
Upgrade #5: Improve Your Wi-Fi Card and Router

Why You Want It: If you never get enough Wi-Fi bars, your transfer rate seems slow, or you keep dropping your connections, a new 802.11n wireless card could help, along with an 802.11n router to connect to. Up until 2009, most notebooks came with the older 802.11g wireless standard which is reasonably fast, but has shorter range and much lower transfer rates than 802.11n.
How to Buy It: Look for a USB 802.11n wireless adapter that supports transfer rates up to 300 Mbps, the maximum rate. You can usually find an adapter like the Zonet ZEW2546 selling for well under $30 online. If you don't already have an 802.11n router at home, buy one which also support up to 300 Mbps transfers. The TRENDnet TEW-639GR is one of many solid choices.
Install It: Adding a USB wireless adapter to your notebook is as easy as plugging it into an available port and then installing any bundled driver software if it doesn't install automatically. To set up a new router, you'll need to follow the manufacturer's instructions carefully as each brand has its own set up routine.
