How to Create Keyboard Shortcuts in Windows 10
Any time you open a Windows app by rolling your mouse pointer over to an icon or lift your finger up and tapping on a tile, you're wasting time and putting unnecessary strain on your shoulder. The fastest and least physically-taxing way to launch any program is with a keyboard shortcut you can hit without even lifting your hands off of the homerow. Windows 10 allows you to create custom shortcuts for any program, whether it's a traditional "desktop" app, a new-fangled "universal app" or one of Windows 8's "metro apps." Here's how.
Method 1: Create a Desktop Shortcut
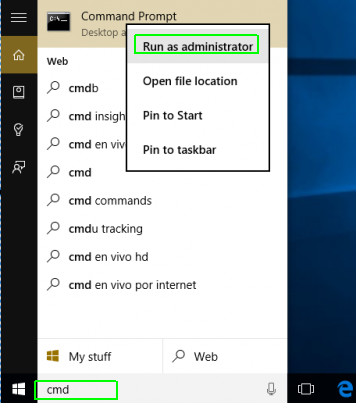
1. Open a command prompt window. You can get there by typing "cmd" into the Cortana / Search box and then right clicking on Command Prompt and selecting "Run as administrator."
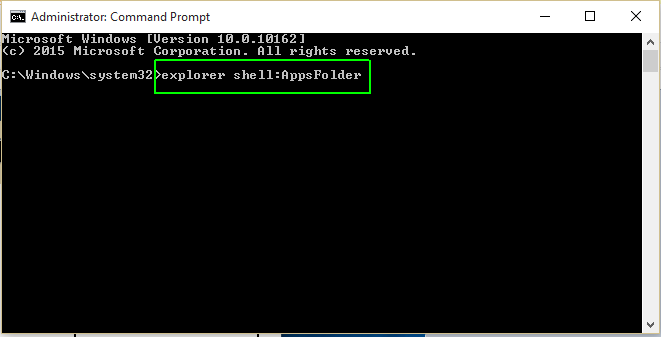
2. Type "explorer shell:AppsFolder" (without quotes) at the command prompt and hit Enter. A window with a list of all your apps appears.
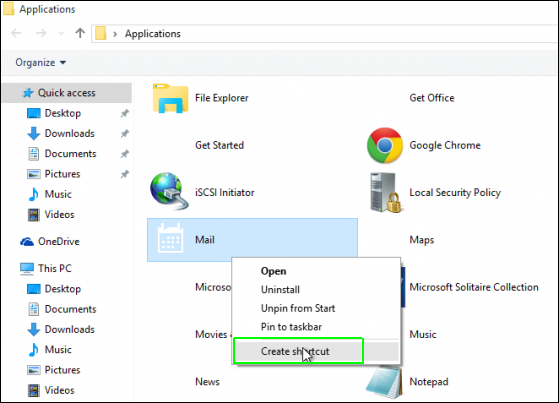
3. Right click on an app and select Create shortcut. It may be easier to find your app if you change the view setting to "detailed list" so you can see all the icons in a single column.
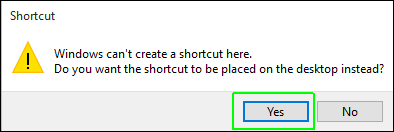
4. Click Yes when asked if you want the shortcut on the desktop. A new shortcut icon appears on your desktop.
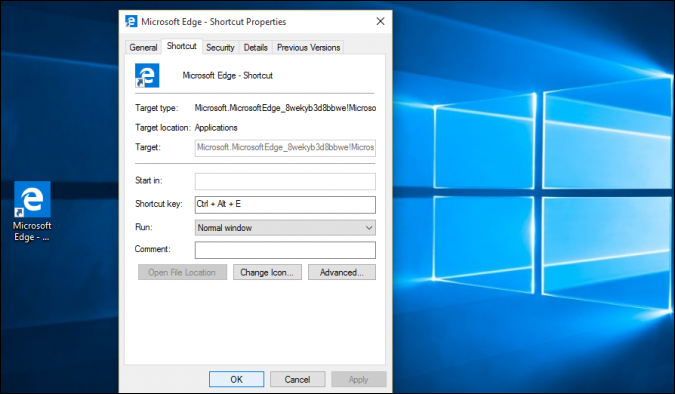
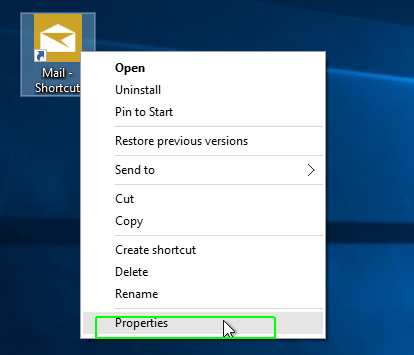
5. Right click on the new shortcut icon and select Properties.
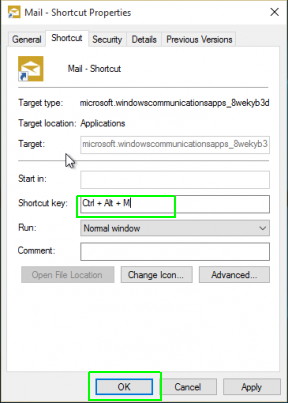
6. Enter a key combination in the Shortcut key field. The combination must be CTRL + ALT + a letter / number.
Sign up to receive The Snapshot, a free special dispatch from Laptop Mag, in your inbox.
7. Click OK.
Note: Remember not to use the same key combination twice. Also note that some programs use CTRL + ALT + keyboard shortcuts that would also launch if you were in their windows. For example, in Photoshop Elements, CTRL + ALT + I brings up the resize menu.
Method 2: Use the Start Menu
If you're creating a keyboard shortcut for a "desktop app," any application that installs via direct download rather than Windows Store alone, you can create the shortcut directly from the Start Menu. By using this method, you can avoid creating a separate shortcut icon on the desktop.
1. Open the Start Menu.
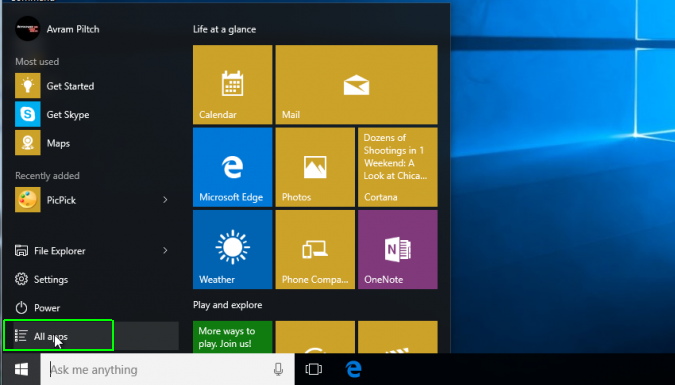
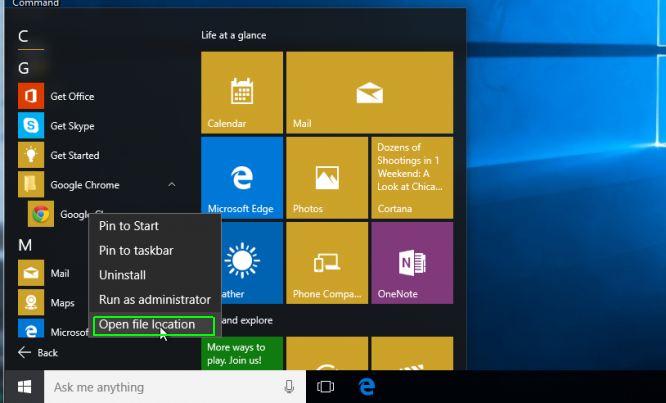
2. Navigate to the icon or tile for the app you want. If the app is not pinned as a tile, you can find it by clicking on the All apps and scrolling through the alphabetical list.
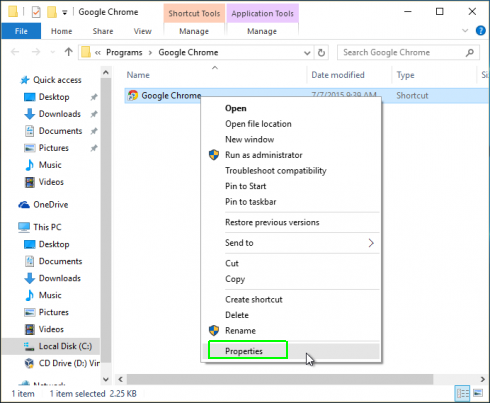
3. Right click and select Open file location. A window opens with a shortcut icon. If Open file location doesn't appear on the menu, this is a modern or universal app and you'll have to follow method 1 above.
4. Right click on the shortcut icon and select Properties.
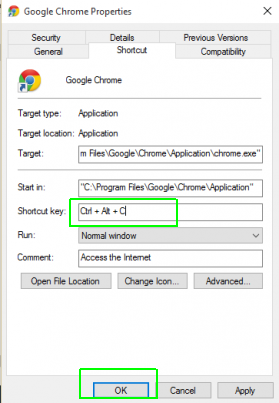
5. Enter a key combination in the "Shortcut key" box.
6. Click OK.
Customize Windows 10
- Create Custom Keyboard Shortcuts
- Make Windows 10 Look and Feel Like Windows 7
- Change the Default Windows Font
- Turn Off Notification and System Sounds
- Change Your Desktop Background in Windows 10
- Change the Icon Size
- Give Windows 10 a Dark Theme
- Make Your Own Windows 10 Theme
- Hide Your Name on the Login Screen
- Add Another Column to the Start Menu
- Get Mac-Like File Previews
- Add My Computer Icon to Desktop
- Edit Photos to Fit as Backgrounds
- Add Accent Colors
- Customize Autoplay Menu
- Install and Delete Fonts
- Customize the Action Center
- Disable Transparency Effects
- Get Classic Solitaire and Minesweeper
- Change the Look of Windows 10 Books
- Add a URL Field to the Taskbar
- Add Clocks from Multiple Time Zones
- Get the Old Volume Control Back
- Disable Windows 10 Startup Delay
- Add Quick Contacts to the Start Menu
- Show Hidden Files and Folders
- Enable Spatial Sound
- Best Themes
- All Windows 10 Tips
- Change the Login Screen Background
- Install New Desktop Themes

