How to Manage Snap Assist Settings in Windows 10
News
By Bryan Clark
published Windows Snap Assist adds efficiency to even the most bloated of workflows. Better still, there are a handful of customization options within the Settings menu that allow you to further fine tune your workflow.

While this isn’t quite as powerful as most third-party windows management apps, it’s often more than enough to do the job and I find it’s rare that most users even need to worry about adding a more robust management tool.
Here’s how to find the Snap Assist settings, and how to customize them to your liking.
- Right click the Start menu and choose Settings.
- Click System.
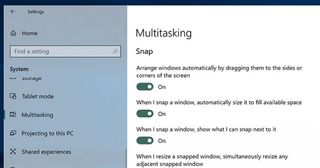
- In the sidebar at the left of the screen, choose Multitasking.
- At the top of the screen, you’ll see a list of four options for Windows Snap Assist customization. Simply toggle each slider on or off depending on whether you’d like to enable or disable the feature.
Here’s what they do:
- Arrange windows automatically by dragging them to the sides or corners of the screen. Disables Snap assist when Off.
- When I snap a window, automatically size it to fill available space. This option prevents the second window from utilizing all of the available real estate in a side-by-side configuration.
- When I snap a window, show what I can snap next to it. When off, Windows will no longer display apps, programs, or other windows that can be snapped into an available area.
- When I resize a snapped window, simultaneously resize any adjacent snapped window. Resize snapped windows by automatically by default, or manually to your liking.
Stay in the know with Laptop Mag
Get our in-depth reviews, helpful tips, great deals, and the biggest news stories delivered to your inbox.
Most Popular


MORE FROM LAPTOP MAG...


